- Key Takeaways
- How to Tell If Your Home Has Poor Ventilation
- Common Causes of Poor Home Ventilation
- Fast, Practical Actions You Can Take Right Now
- Spot Ventilation Best Practices for Kitchens and Bathrooms
- Whole-House Ventilation Options: Which Type Fits Your Home?
- How to Assess Your Home’s Ventilation Before You Fix It
- Permanent Fixes: Air Sealing, Duct Repair, and Mechanical Ventilation
- Moisture and Humidity Control Tied to Ventilation
- When to Hire a Professional and What to Ask Them
- Maintenance and Commissioning That Keep Systems Working
- Typical Costs and Timelines for Ventilation Upgrades
- How Upright Construction & HVAC Approaches Ventilation Upgrades
- Get Your Home’s Ventilation Properly Assessed
- Sources
- FAQ
- Recommended
The fastest path to better indoor air is a three-part approach: control the pollution sources in your home, dilute what’s left with real ventilation, and back it up with filtration and humidity control. Most homes need both quick fixes and a permanent mechanical solution, and the order matters. Air seal before you add mechanical ventilation, not after, or you’ll waste money running a fan against leaks you haven’t fixed.
Here’s what to do in the next hour, no tools required:
- Crack windows on opposite sides of the house for cross-ventilation
- Turn on your bathroom fan every time you shower, and leave it running 20 minutes after
- Run your kitchen range hood on high while cooking, especially with gas burners
- Check that your dryer vent actually terminates outdoors, not into the attic
- Swap ceiling fans to reverse (counterclockwise in summer) to push stale air toward openings
Safety first: if you have a gas furnace, water heater, or fireplace, never seal up combustion appliance rooms without adding makeup air. Backdrafting can pull carbon monoxide back into your living space.
Key Takeaways
Better indoor air comes down to controlling pollution sources, adding real ventilation to dilute what’s left, and sealing your home properly before installing any mechanical system.
| Point | Details |
|---|---|
| Sequence matters | Air seal your home before adding mechanical ventilation, or you’ll waste energy and control less effectively. |
| Spot ventilation first | Upgrade undersized bathroom and kitchen fans before considering whole-house systems; they solve most moisture complaints. |
| Target humidity range | Keep indoor relative humidity between 30 and 50 percent, and never let it climb above 60 percent. |
| ERV/HRV pays off in extreme climates | These systems recover 70 to 80 percent of exhaust air energy, making them worth the cost where winters or summers are harsh. |
| Commission every installation | Insist on measured airflow numbers after any ventilation upgrade, a standard Upright Construction & HVAC builds into every project. |
How to Tell If Your Home Has Poor Ventilation
Your house is usually telling you something before you notice the mold. The signs show up in specific places, and once you know where to look, diagnosing the problem takes about ten minutes.
Watch for these:
- Persistent musty or cooking smells that linger for hours after the activity stops
- Window condensation, especially in winter mornings, which signals excess indoor humidity
- Visible mold or dark spots in bathroom corners, closets, or around window frames
- A stuffy feeling in rooms with the door closed, even with the AC running
- Dust buildup that returns quickly after cleaning, often a sign of poor air exchange
- Frequent allergy or asthma flare-ups indoors that ease when you go outside
Each symptom points to a specific gap. Smells that won’t clear mean your air isn’t turning over fast enough. Condensation and mold point to excess moisture without enough exhaust. Dust and stuffiness usually mean stagnant air with no fresh supply coming in.
Pro Tip: Start your inspection in the bathroom and kitchen first, since these two rooms produce the most moisture and pollutants in a typical home. If those exhaust fans aren’t pulling air (hold a tissue near the grille; it should flutter), everything downstream gets harder to fix.
Common Causes of Poor Home Ventilation
Most ventilation problems trace back to a handful of repeat offenders, and knowing which one you’re dealing with tells you whether it’s a weekend DIY job or a call to a licensed contractor.
- Missing or undersized spot exhaust in bathrooms and kitchens
- Ductwork that’s disconnected, crushed, or leaking into the attic instead of outdoors
- Blocked or capped outdoor vent terminations (birds’ nests are a common culprit)
- No whole-house ventilation strategy at all, just spot fans running randomly
- Aggressive air sealing or new windows installed without adding replacement ventilation
- Combustion appliances backdrafting because the house is depressurized
- Climate-driven humidity swings that overwhelm whatever ventilation you have
Sealing your home tight without planning for ventilation is one of the more common retrofit mistakes homeowners make. The Department of Energy’s guidance on tight building envelopes is blunt about it: seal tight, then ventilate right, in that order. Skip the second half and you trap moisture, pollutants, and sometimes combustion gases indoors.
You can usually DIY vent termination checks, fan testing, and basic caulking yourself. Disconnected ducts inside walls, backdrafting appliances, and whole-house system design need a professional.
Fast, Practical Actions You Can Take Right Now
You don’t need a permit or a contractor to start improving your air today. These steps work within minutes to hours, and most cost nothing.
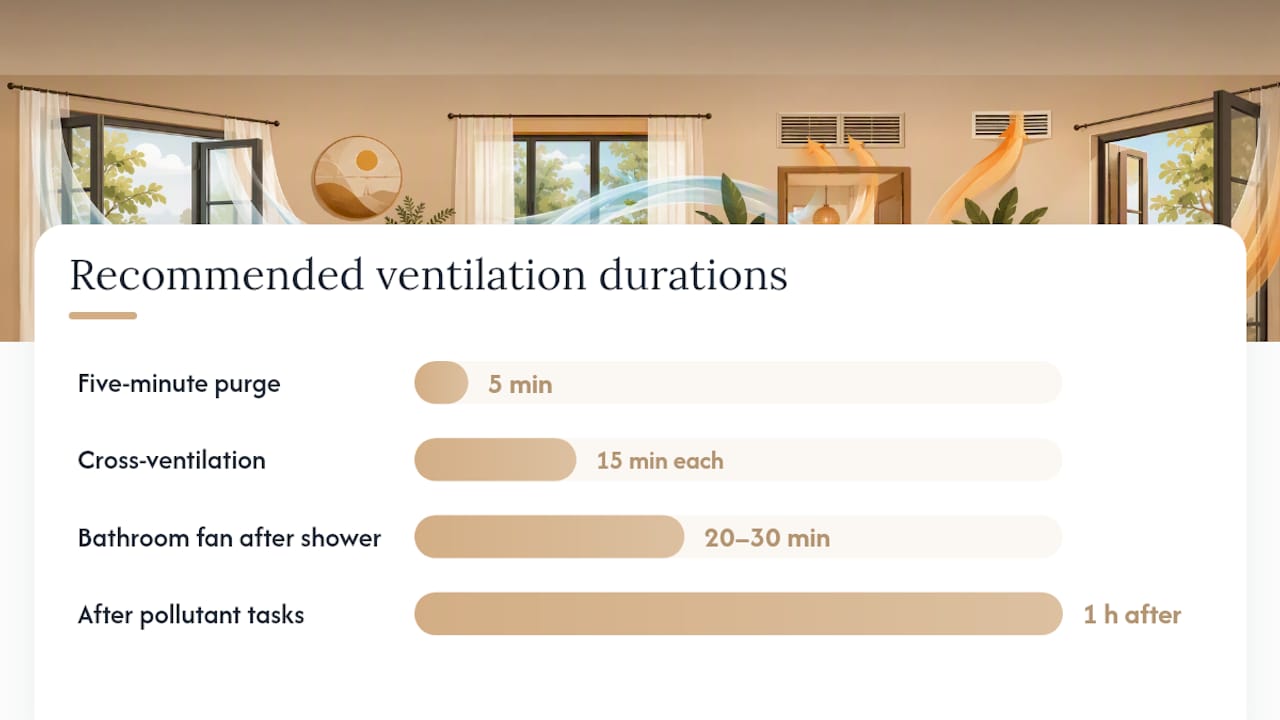
- Open windows on opposite ends of the house. Cross-ventilation moves air through instead of just around one room. Even 15 minutes twice a day helps.
- Point box fans strategically. Put one fan blowing out of a window on the downwind side and, if you have a second fan, another pulling fresh air in on the upwind side.
- Run your range hood every time you cook, and make sure it vents outside rather than just filtering and recirculating. Gas stoves in particular put off nitrogen dioxide and fine particulates that a recirculating hood won’t remove.
- Turn on bathroom fans before you shower, not after, and let them run 20 to 30 minutes past when you finish.
- Vent your dryer to the exterior, and clean the lint trap and vent line at least once a year. A clogged dryer vent is both a fire risk and a moisture source.
- Ventilate during and after pollutant-heavy tasks like painting, using cleaning chemicals, or sanding. Open windows and run exhaust fans the whole time, then for another hour after.
A couple of safety notes matter here. If your neighborhood has heavy outdoor air pollution, wildfire smoke, or high pollen counts, opening windows can trade one indoor air problem for a worse one. Upright Construction & HVAC has addressed this specific tradeoff in a guide on protecting your family during bad air quality days, and it’s worth a read if you live somewhere with seasonal smoke or smog.
Also, never rely on opening a window as your only ventilation strategy in a home with a gas furnace, water heater, or fireplace. If you smell anything unusual near a combustion appliance, get outside and call for help. Carbon monoxide has no smell of its own, but a malfunctioning appliance often gives other warning signs first.
Pro Tip: After cooking a big meal or running a hot shower, do a five-minute “purge.” Open two windows across from each other and run every exhaust fan in the house at once. This brief high-exchange burst clears more moisture and odor than an hour of low-level ventilation.
Spot Ventilation Best Practices for Kitchens and Bathrooms
Spot ventilation catches pollutants right where they’re produced, before they spread through the rest of the house. That’s why the range hood belongs directly above the cooktop, the bathroom fan needs to be sized for the room, and your dryer, garage, and any combustion equipment all need dedicated exhaust to the outdoors.
Look for these features when choosing or upgrading fans:
- Timers so the fan runs a set duration after you leave the room
- Delay-off switches that keep exhausting for 20 to 30 minutes automatically
- Humidity sensors that kick the fan on when moisture spikes, even if nobody’s home
- Occupancy sensors for rooms where people forget to flip the switch
On sizing, bathroom fans generally need enough capacity to handle the room’s square footage, and kitchen range hoods need higher capacity for gas cooking than electric. Sound level matters as much as airflow. A fan rated at 300 CFM that’s too loud to run won’t get used, and a fan that never runs doesn’t help anyone. According to the Building America measure guide on selecting ventilation systems, many existing bathroom fans underperform their rated capacity, and simply cleaning the grille or replacing an old unit with an ENERGY STAR certified fan often solves problems homeowners assumed needed a bigger fix.
Every spot fan needs to terminate outdoors, never into an attic or crawlspace. That single detail gets missed more often than you’d think.
Whole-House Ventilation Options: Which Type Fits Your Home?
Once spot ventilation and air sealing are handled, the next question is whether your home needs continuous, whole-house mechanical ventilation. The Department of Energy identifies four basic system types, and each one handles pressure, moisture, and filtration differently.
Exhaust-only systems pull stale air out continuously, usually through a bathroom fan running on low speed around the clock, and rely on air leaking back in through gaps and window cracks. They’re the cheapest option and simplest to install, but in humid climates they can pull in moist outdoor air uncontrolled, and they slightly depressurize the house, which raises backdrafting risk near combustion appliances.
Supply-only systems push filtered outdoor air in and let it leak back out. These pressurize the house slightly, which helps keep pollutants like radon from being pulled in through the foundation, but they can push moist air into wall cavities in cold climates if you’re not careful.
Balanced systems bring in and exhaust equal amounts of air using two fans, so they don’t pressurize or depressurize the house. They cost more to install than exhaust-only or supply-only setups but avoid the drawbacks of both.
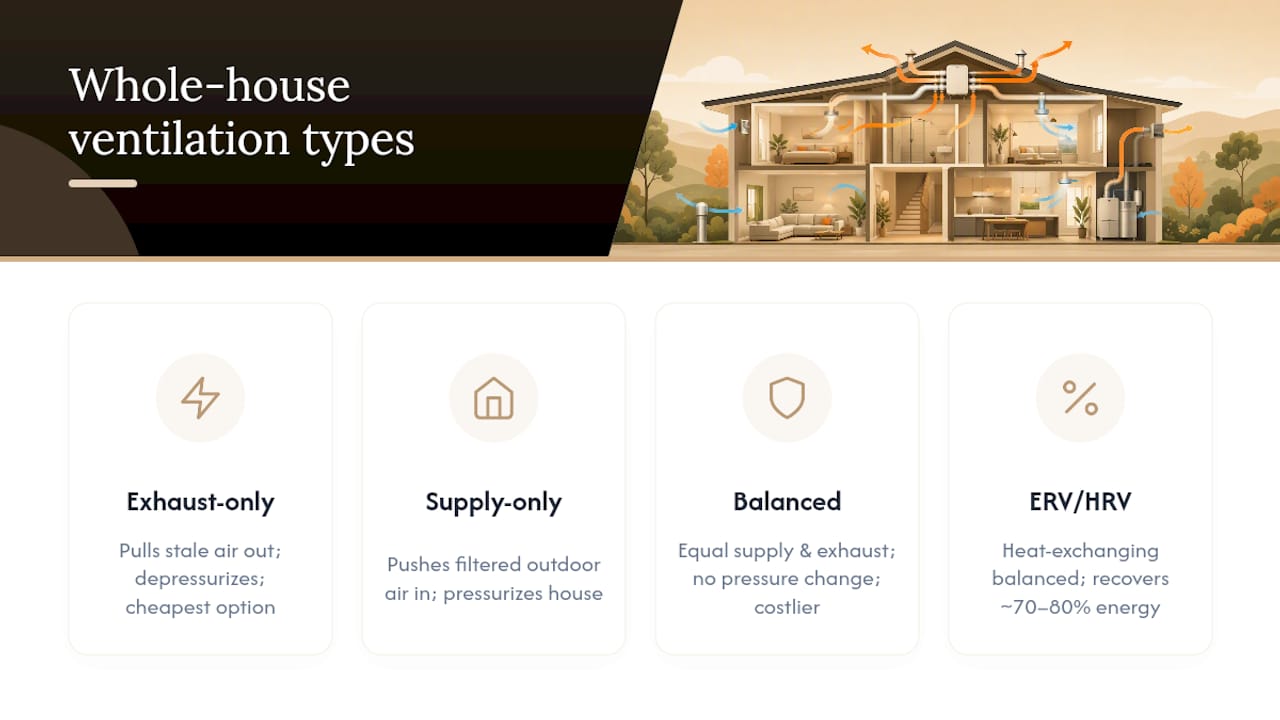
Energy and heat recovery ventilators (ERV/HRV) are balanced systems with a twist: a core exchanges heat, and in the case of ERVs, moisture, between the outgoing and incoming air streams. That means you’re not paying to condition all that fresh air from scratch. ERVs and HRVs recover roughly 70 to 80 percent of the energy in exhaust air, which makes them worth the higher upfront cost in climates with harsh winters, hot summers, or expensive utility rates.
For most homes in mixed or moderate climates, a balanced ERV is the strongest long-term choice because it manages both temperature and humidity transfer. In very cold climates, an HRV without moisture transfer sometimes makes more sense to avoid over-humidifying dry winter air. In hot, humid regions, exhaust-only systems paired with a dehumidifier can work, but they demand more attention to combustion safety.
Installation complexity and ongoing maintenance both scale up as you move from exhaust-only to balanced ERV systems. A basic exhaust fan upgrade is a same-day job. A ducted, whole-house ERV with dedicated supply and return runs typically takes longer and needs commissioning to verify it’s actually delivering the airflow it was designed for.
How to Assess Your Home’s Ventilation Before You Fix It
A proper assessment doesn’t require expensive equipment, at least not for the first pass. Start with a homeowner checklist you can run through in an afternoon.
- Turn on every exhaust fan in the house and confirm each one is actually moving air (tissue test at the grille)
- Trace duct runs where you can access them (attic, crawlspace) and look for disconnects, kinks, or crushed sections
- Check that every exhaust duct terminates outdoors with a functioning damper, not into an attic space
- Inspect your dryer vent for lint buildup or a crushed flex line
- Note where you notice persistent odors, humidity, or condensation, and how long they linger
- Look at attic and crawlspace ventilation for blocked soffit vents or missing insulation baffles
Beyond the visual walkthrough, a few measurements separate a rough guess from a real diagnosis. Homeowners can track indoor relative humidity cheaply with a $15 hygrometer placed in a few rooms. Fan CFM testing and blower-door testing for whole-house air leakage require professional equipment and training, so those belong on a contractor’s list rather than a Saturday project. The measure guideline on selecting ventilation systems for existing homes recommends exactly this kind of staged approach: homeowner visual checks first, then professional airflow measurement before any system design decisions.
Pro Tip: If you’re unsure whether an issue is a fan problem or a duct problem, ask a contractor to bring a flow hood to your assessment. It measures actual delivered airflow at the grille in about two minutes and tells you immediately whether the fan itself or the ductwork behind it is the bottleneck.
Call a qualified HVAC contractor once you’ve found disconnected ductwork you can’t safely access, persistent mold that keeps returning after cleaning, or any sign that a combustion appliance isn’t drafting correctly. Those aren’t DIY situations.
Permanent Fixes: Air Sealing, Duct Repair, and Mechanical Ventilation
Lasting ventilation improvements follow a specific sequence, and skipping steps is how homeowners end up with new problems instead of solved ones.
- Pre-retrofit assessment. Check combustion safety and estimate your home’s moisture load before touching anything. The EPA’s energy-savings-plus-health guidelines specifically call out this step because sealing without a ventilation plan can trigger backdrafting or trap moisture.
- Air seal and insulate. Close up leakage paths between living space and unconditioned areas like attics and crawlspaces.
- Seal and repair ductwork. Use mastic or foil-faced tape, never ordinary duct tape or screws alone, since those joints fail within a few years and undercut your delivered airflow.
- Select and install whole-house ventilation. This is where an ERV or HRV gets sized and placed based on your home’s square footage and occupancy.
- Commission and balance the system. Measure actual delivered airflow, not just what the equipment is rated for on paper.
A contractor’s installation checklist should include ducts that terminate outdoors with working dampers, clearly labeled controls so you know what each switch does, and documented airflow measurements taken after installation, not just design calculations. During commissioning, insist on three checks: measured flow at each outlet, a backdrafting test on combustion appliances with the new system running, and verification that any automatic controls and schedules actually work as programmed.
Reusing existing ductwork can lower costs on a retrofit, but only if every joint gets properly sealed. Skip that detail and you’re paying for a system that’s leaking a chunk of its airflow into your attic.
Moisture and Humidity Control Tied to Ventilation
Indoor relative humidity should stay between 30 and 50 percent, and never above 60 percent, according to the EPA’s indoor air quality guidance. Below that range, you’ll notice dry skin and static; above it, mold and dust mites thrive.
Ventilation and humidity have a complicated relationship depending on your climate. In humid regions, opening windows or running exhaust-only ventilation can actually pull in more moisture than it removes, especially during summer afternoons. Running an ERV alongside your air conditioner, scheduling ventilation for cooler and drier parts of the day, and adding a standalone dehumidifier in problem rooms all help keep humidity in check without giving up fresh air.
Pro Tip: A humidity sensor wired to your bathroom fan automates the whole problem. It kicks the fan on the moment moisture spikes from a shower and shuts it off once levels drop back down, so you’re never relying on someone remembering to flip a switch.
When to Hire a Professional and What to Ask Them
Some ventilation problems are genuinely beyond a weekend project. Call a licensed contractor if you’ve got a combustion appliance that’s backdrafting, mold that returns after you’ve cleaned it more than once, ductwork buried in walls or crawlspaces you can’t access, or humidity you can’t get under control no matter what you try.
When you’re vetting a contractor, ask these questions before signing anything:
- Are you familiar with ASHRAE 62.2 and do you design to its ventilation rate targets?
- How do you commission a system after installation, and will you provide measured airflow numbers, not just design estimates?
- What are your sample airflow targets for a home like mine, and how did you calculate them?
- What’s covered under warranty, and what does the maintenance plan look like afterward?
- Can you show proof of licensing and insurance?
For quotes, make sure the scope explicitly includes air sealing (not just the ventilation equipment), a clear statement of what ductwork is included versus excluded, fan ratings tested at 0.25 in. w.g. static pressure (a more honest number than free-air ratings), and where an ERV or HRV unit will be placed with enough clearance for filter changes and service.
- Combustion appliance issues or complex attic ductwork: hire a pro
- Basic fan replacement or caulking gaps around windows: DIY is fine
Maintenance and Commissioning That Keep Systems Working
A ventilation system only performs as well as it’s maintained. Build a simple recurring schedule:
- Clean fan grilles and housings every three to six months to keep airflow from choking down on dust
- Replace or clean filters on your schedule’s cadence, typically every one to three months for standard filters
- Clean ERV/HRV cores once or twice a year depending on usage and local air quality
- Check outdoor terminations and backdraft dampers annually for debris, nests, or stuck flaps
After any new installation, commissioning should include measured airflow at each outlet, confirmation that labeled controls do what they say, and a walkthrough explaining operation and upkeep to the homeowner, with documentation left behind. If airflow ever seems off or a room starts feeling stuffy again, that’s your signal to call for a re-commissioning check rather than assuming the system just needs time to “settle in.”
Typical Costs and Timelines for Ventilation Upgrades
Budgeting for ventilation work varies widely depending on scope, but a few general patterns hold across most projects.
- New bathroom fan replacement: typically a same-day job, and one of the highest-value upgrades you can make since undersized, noisy fans often get skipped entirely
- Range hood upgrade: usually completed in a day, longer if new ducting to the exterior is needed
- Duct sealing and repair: timeline depends heavily on duct accessibility, from a few hours to a full day
- Whole-house exhaust or supply system: installation generally spans one to two days
- ERV/HRV installation: the most involved option, often requiring dedicated ductwork and multiple days of work
- Air sealing: ranges from a half-day spot treatment to a multi-day whole-house project depending on your home’s size and how leaky it is
If you’re facing several of these at once, phase the work by risk. Fix combustion safety and spot ventilation issues first, then tackle air sealing, then move to whole-house mechanical ventilation. Financing options can help spread the cost of a larger retrofit like an ERV installation combined with duct sealing, rather than trying to fund it all in one project.
How Upright Construction & HVAC Approaches Ventilation Upgrades
Every ventilation job Upright Construction & HVAC takes on follows the same sequence: assess the home’s current airflow and moisture situation, handle air sealing and source control issues first, then design and install whatever mechanical ventilation the home actually needs, commission it with real measurements, and set up a maintenance plan so it keeps performing.
We don’t install a fan and walk away. A system is only as good as the numbers we measure after it’s running, and homeowners deserve to see those numbers, not just take our word for it.
Clients get a licensed team, 24/7 emergency support for anything that can’t wait until morning, and clear documentation of what was installed and why. No system goes live without a homeowner walkthrough explaining what each control does and when filters or cores need attention.
- Licensed, insured technicians on every job
- Documented commissioning measurements, not just estimates
- Written scope and warranty terms before work begins
- 24/7 availability for combustion safety concerns or emergencies
A note from Ernie M
I’ve walked into a lot of homes where the family assumed their air conditioner was broken when really their house just wasn’t breathing right. Ventilation problems hide in plain sight, and most of them have a fix that doesn’t cost much once you know where to look. What I care about most is safety first, always, especially anything touching a gas appliance, and then giving homeowners a system that actually does what it’s supposed to do, with numbers to prove it. You don’t need to become an HVAC expert to fix your air. You just need the right first steps and someone honest to call when the job gets bigger than a weekend project.
Get Your Home’s Ventilation Properly Assessed
A hygrometer and a tissue test at the fan grille will tell you a lot, but they won’t catch a disconnected duct buried in your attic or a combustion appliance that’s backdrafting under specific conditions. Upright Construction & HVAC brings the equipment and licensing to close that gap: fan flow testing, duct inspection, air sealing, and full ERV or HRV design and installation with real commissioning measurements handed to you at the end, not just a verbal “it’s working fine.”

If a walkthrough turns up an aging furnace or AC unit struggling to keep up alongside your ventilation issues, our team can also handle HVAC repair with same-day service across the Los Angeles area. Financing is available for larger projects that combine air sealing, duct repair, and whole-house ventilation into one phased plan. Reach out for an assessment, and we’ll walk your home with you, point out exactly what’s driving your air quality issues, and give you a written scope before any work starts.
Sources
- Measure Guideline: Selecting Ventilation Systems for Existing Homes
For anything touching local code compliance, consult ASHRAE 62.2 directly or ask a licensed contractor to walk you through how it applies to your specific home.
FAQ
What is the 3 degree rule for ventilation?
There’s no universal “3 degree rule” in residential ventilation standards like ASHRAE 62.2; the term shows up more often in HVAC duct design discussions about airflow angles. If you’ve seen it referenced for your specific system, ask your contractor directly what it means for your home’s design.
What are the 3 C’s of ventilation?
Not a term from EPA, DOE, or ASHRAE guidance. The closest recognized framework is EPA’s three-part strategy of source control, ventilation, and filtration, which serves the same purpose homeowners usually mean when searching for a simple rule of thumb.
How do I improve ventilation under my house?
Start by checking crawlspace vents for blockages from debris or overgrowth, since a blocked crawlspace often drives up whole-house humidity and musty odors. If vents are clear but moisture persists, a vapor barrier on the crawlspace floor combined with a dedicated crawlspace ventilation fan usually solves the problem, though a professional assessment can confirm whether sealing and conditioning the space fits your home better than passive venting.
How often should I replace bathroom or kitchen exhaust fans?
Replace fans sooner if they’re noisy, weak, or don’t clear steam within a few minutes of running.
Can Upright Construction & HVAC install an ERV or HRV in an existing home?
Yes. Upright Construction & HVAC handles full assessment, air sealing, duct work, and ERV or HRV installation with commissioning measurements included, so you get documented proof the system delivers its designed airflow.