
- Why does an AC evaporator coil freeze in the first place?
- How do you know if your AC unit is actually frozen?
- Step-by-step: how to safely thaw a frozen AC
- How to test the system after it has fully thawed
- What you can fix yourself versus what requires a technician
- Routine maintenance that prevents coils from freezing again
- When should you call a technician, and what will it cost?
- Safety warnings: what you must never do with a frozen AC
- Key Takeaways
- What I’ve learned after 15 years of frozen AC calls
- Upright Construction & HVAC is ready when your system needs more than a filter swap
- FAQ
- Recommended
TL;DR:
- A frozen AC requires immediate intervention to prevent costly damage, including setting the thermostat to off and switching the fan to on. The coil should be allowed to thaw naturally over 2 to 24 hours, with careful monitoring and proper water management, avoiding heat sources like hair dryers or scrapers. Most freezes stem from airflow issues or refrigerant leaks; diagnosing correctly before reactivating the system is crucial, and professional help may be needed for persistent problems.
If your AC is frozen, stop the cooling cycle right now. Set your thermostat to OFF and switch the fan to ON. That single move stops ice from building further and protects your compressor from the kind of damage that turns a $300 repair into a $3,000 one. Carrier confirms that a frozen AC will not fix itself — you have to intervene.
Here is what to do in the first five minutes:
- Set thermostat to OFF (not just a higher temperature — fully off)
- Switch fan setting to ON so room-temperature air circulates over the coil
- Lay towels or place a shallow pan under the indoor air handler to catch meltwater
- Pull out the air filter and inspect it — replace it if it looks gray or clogged
- Do not restart cooling until the unit is completely dry and ice-free
Thaw time can vary depending on how thick the ice is; it typically takes 2–24 hours for the ice to fully melt. Monitor the meltwater flow during this period so it does not overflow the drain pan.
Never use a hair dryer, heat gun, or space heater to speed things up. Carrier’s guidance is explicit: thermal shock from direct heat can crack copper lines or permanently damage aluminum coil fins. Chipping at the ice with a screwdriver is equally risky. Let it melt on its own.
Pro Tip: If you are not sure whether the compressor is still cycling, turn the system off at the breaker entirely. That guarantees the compressor cannot start while the coil is still iced.
Why does an AC evaporator coil freeze in the first place?
Trane identifies two root categories for frozen evaporator coils: restricted airflow and refrigerant problems. Every freeze traces back to one of those two. Understanding which one you are dealing with determines whether you can fix it yourself or need a licensed technician.
Airflow culprits (the more common cause):
- Dirty or clogged air filter — the single leading cause of residential AC freezes
- Closed or blocked supply registers (closing vents in unused rooms actually hurts the system)
- Furniture or curtains blocking return air grilles
- Dirty evaporator coil fins with years of dust buildup
- Failing or slow blower motor that cannot move enough air across the coil
Refrigerant and metering issues:
- Refrigerant leak causing low charge and dropping suction pressure below 32°F
- Stuck or malfunctioning TXV (thermostatic expansion valve) metering device
- Improper refrigerant charge from a previous installation or service
Environmental and thermostat factors also play a role. Running your AC when outdoor temperatures drop below about 60°F causes refrigerant pressure to fall too low, and the coil freezes even with a clean filter. Setting the thermostat extremely low — say, 65°F on a humid day — pushes the coil harder than it was designed to run. High indoor humidity accelerates ice formation once the coil temperature dips below freezing.
The coil temperature only needs to drop below 32°F for moisture in the air to condense and freeze on contact. Once a thin ice layer forms, it insulates the coil from warm air, which makes the freeze accelerate — a snowball effect that can encase the entire unit in hours.
How do you know if your AC unit is actually frozen?
You do not need to open anything to get a strong read on whether the coil is frozen. Trane’s troubleshooting guide lists the most reliable visible signs:
- Ice on the copper refrigerant lines — look for frost or a white coating on the insulated suction line running from the indoor unit to the outdoor condenser
- Ice visible on the air handler cabinet — especially at the bottom panel or around the access door
- Weak or warm airflow from supply vents — the coil is blocked, so little air gets through
- Water puddles near the indoor unit — ice is melting and overflowing the drain pan
- System runs continuously but never cools the house — the frozen coil cannot absorb heat
Quick non-invasive checks you can do right now:
- Hold your hand over a supply vent. Weak airflow with warm air is a strong freeze indicator.
- Walk to the outdoor condenser and look at the large insulated copper line entering the unit. Frost on that line points to either a refrigerant issue or a severe airflow restriction.
- Listen near the indoor unit for unusual hissing or bubbling sounds, which can suggest a refrigerant leak.
- Check your thermostat display — if it reads 80°F when set to 72°F and the system has been running for hours, something is blocking heat exchange.
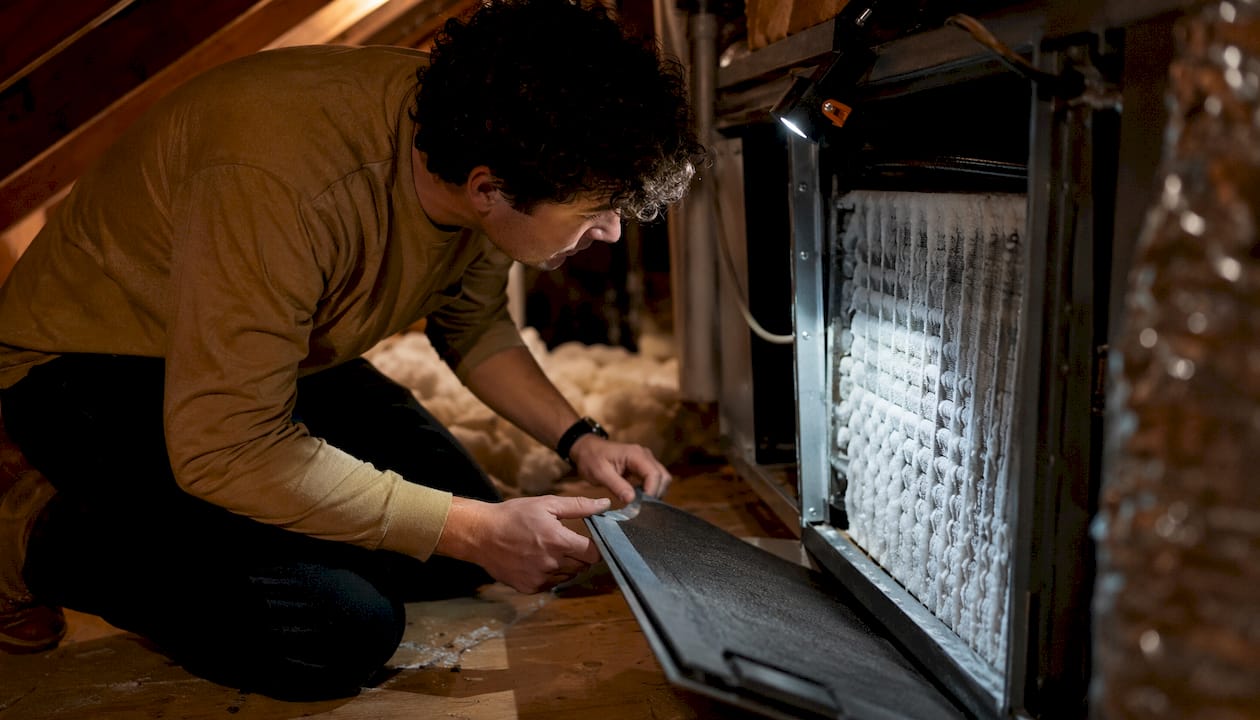
If you can safely access the air handler (power off first), remove the access panel and look directly at the coil fins. White or gray frost on the fins, or a solid block of ice, confirms the freeze.
Step-by-step: how to safely thaw a frozen AC
Follow these steps in order. Skipping ahead risks compressor damage or a flooded floor.
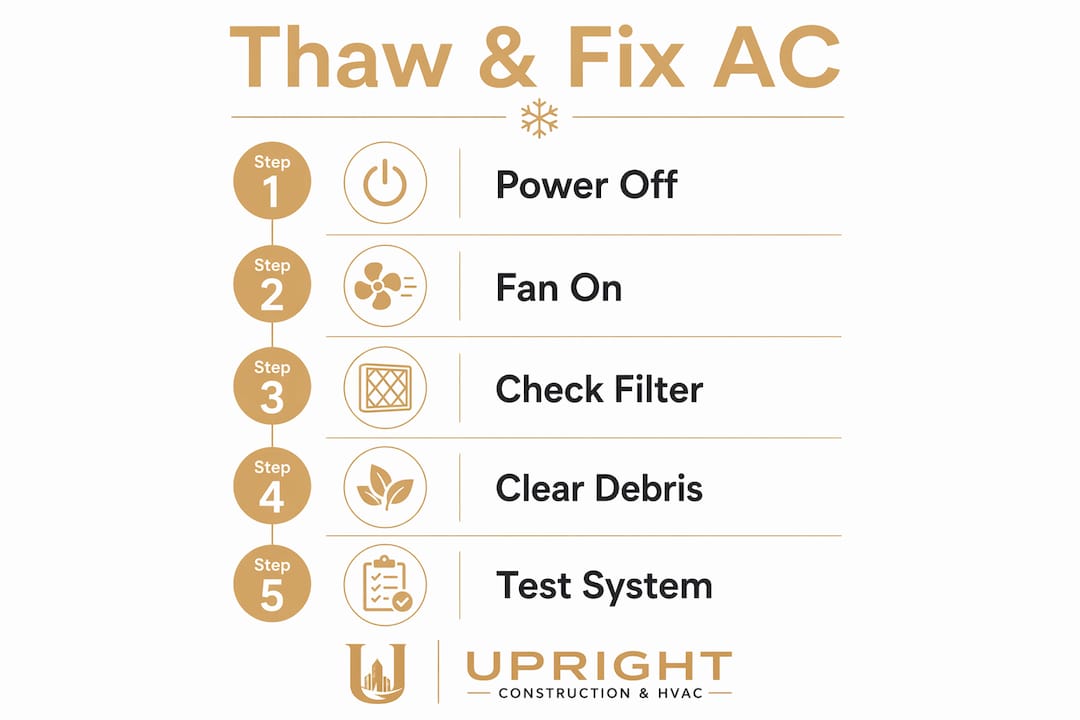
- Shut off cooling immediately. Set the thermostat to OFF. If you are uncertain whether the compressor is still cycling, flip the breaker for the air handler and outdoor unit.
- Set the fan to ON. This keeps the blower running without the compressor, moving room-temperature air across the iced coil to speed the melt. It is the fastest safe thaw method.
- Manage the meltwater. Place old towels under the indoor unit and set a shallow pan beneath the drain outlet. If you have a wet/dry vac, position it at the condensate drain exit — a clogged condensate drain can cause water to back up and overflow onto your ceiling or floor.
- Wait for a complete thaw. Light ice clears in a short time; a heavy freeze can take much longer to fully thaw. Check every few hours and feel the coil area through the access panel (with power off) to confirm the ice is gone.
- Dry the area before restarting. Wipe down any standing water around the unit and confirm the drain pan is empty.
The patience rule: A full thaw is not optional before diagnosis. Ice masks refrigerant pressure and temperature readings — a technician cannot accurately measure suction pressure on a frozen coil. Wait until everything is completely clear before running any tests or calling for service.
How to test the system after it has fully thawed
Before you restart, do three things: confirm the area is dry, install a fresh filter, and make sure every supply and return vent in the house is fully open. Then run this short diagnostic sequence.
- Set the thermostat to COOL and fan to AUTO. Let the system run for a short period, typically around 20 to 30 minutes.
- After 20 minutes, go to the outdoor unit and feel the large insulated suction line. It should feel cold and slightly sweaty (condensation on the insulation). If you see frost forming on that line within the test window, Trane’s guidance points strongly to a refrigerant issue — stop the system and call a technician.
- Check airflow from multiple vents. If airflow feels strong and the air is noticeably cool, the filter replacement likely solved the problem.
- Note whether the system reaches the thermostat setpoint within a reasonable time. Document what you observe — times, sounds, whether the suction line frosted — so you have something concrete to hand the technician if a service call is needed.
Signs that mean stop and call a pro:
- Ice reappears within one cooling cycle after a clean filter and full thaw
- Hissing or bubbling sounds near the coil or copper lines
- Airflow remains weak even with a brand-new filter and all vents open
- System trips the breaker or you smell something burning
What you can fix yourself versus what requires a technician
Filter replacement, clearing vents, and removing outdoor debris resolve the majority of first-time freezes. If the ice comes back after those steps, the problem is almost certainly refrigerant or mechanical — and that requires a licensed pro.

| Homeowner DIY | Licensed Technician Only |
|---|---|
| Replace air filter ($5) | Refrigerant leak detection and repair (EPA 608 required) |
| Open all supply and return vents | Refrigerant recharge with manifold gauges |
| Clear outdoor condenser of debris (1–2 ft clearance) | Sealed-system brazing or line repair |
| Clear condensate drain with a wet/dry vac | Blower motor or capacitor replacement |
| Reset breaker and thermostat | Compressor replacement |
| Inspect and wipe down accessible coil fins (after thaw) | TXV/metering device repair |
Decision rule: If the coil refreezes within one cooling cycle after a full thaw and a fresh filter, treat it as a refrigerant or mechanical fault. Do not keep restarting the system — each cycle risks compressor damage.
Pro Tip: Before calling a technician, check whether your AC capacitor is functioning. A weak capacitor slows the blower motor, which reduces airflow enough to cause freezing — and it is one of the first things a tech will check.
Routine maintenance that prevents coils from freezing again
Most freezes are preventable. A short maintenance routine cuts the risk dramatically.
Filter schedule:
- Replace or clean filters regularly during cooling season
- Homes with pets or high dust levels need more frequent filter changes
- A filter you cannot see light through is already overdue
Seasonal prep:
- Schedule an annual spring tune-up before the first hot week — a technician will clean evaporator and condenser coils, verify refrigerant pressure, inspect duct returns, and confirm condensate drain flow.
- Clear the outdoor condenser of leaves, grass clippings, and debris before the season starts. Keep at least 1–2 feet of clearance on all sides.
- Inspect the condensate drain line in spring — flush it with a cup of diluted bleach to prevent algae buildup.
Daily habits that matter:
- Keep all supply and return registers fully open, including those in less-used rooms
- Avoid setting the thermostat below 70°F on very humid days — the coil cannot handle the load
- If outdoor temperatures drop below 60°F at night, switch the system off rather than letting it run
A seasonal HVAC maintenance checklist can help you track these steps and stay ahead of problems before they become expensive.
When should you call a technician, and what will it cost?
Call a technician when you see any of these:
- Coil refreezes within one cooling cycle after a clean filter and full thaw
- Hissing sounds or oil stains near the copper lines (refrigerant leak signs)
- Burning smell, electrical sparking, or repeated breaker trips
- System is older than 10 years and freezing for the first time — aging components and gradual refrigerant loss are likely
What the technician will do: A qualified tech measures suction and discharge pressures with manifold gauges, runs an electronic leak search, inspects the blower motor and capacitor, checks the metering device, cleans coils, and tests compressor health. None of that is guesswork — it is a systematic pressure-and-temperature diagnostic.
Typical U.S. repair cost ranges:
| Service | Typical Cost Range |
|---|---|
| Filter and coil cleaning | $250 |
| Condensate drain clearing | $150 |
| Leak detection, repair, and recharge | $300 |
Most markets offer same-day or next-business-day diagnosis. Actual repairs can take a few hours to a full day depending on parts availability and the scope of the work. For a realistic picture of what drives emergency repair pricing, the HVAC emergency cost factors page breaks it down clearly.
Safety warnings: what you must never do with a frozen AC
Some of the most common homeowner instincts around a frozen AC are also the most damaging. Avoid every item on this list.
- Never run the compressor while the coil is frozen. Carrier is direct about this: continuing to operate a frozen unit risks compressor burn-out — one of the most expensive repairs in residential HVAC.
- Never apply direct heat. Hair dryers, heat guns, and space heaters cause thermal shock. Copper lines can crack; aluminum fins can deform permanently.
- Never chip or scrape the ice. The evaporator coil fins are thin and fragile. A screwdriver or ice pick can puncture a refrigerant line in seconds.
- Never add refrigerant yourself. Refrigerant is a closed loop — low charge means a leak exists somewhere. Handling refrigerant requires EPA Section 608 certification; doing it without that certification is illegal. More practically, adding refrigerant without fixing the leak just delays the next freeze.
- If you smell burning, hear grinding, or see electrical sparking: shut power off at the breaker immediately and call for emergency service. Do not restart the system.
Refrigerant does not “wear out” or get consumed like fuel. If your system is low on refrigerant, there is a hole somewhere in the lines. Recharging without finding and fixing that hole is money spent on a problem that will return — usually faster than you expect.
Quick diagnosis checklist and realistic thaw timeline
Use this before and after the thaw to stay organized:
- Thermostat set to OFF, fan set to ON
- Towels or pan placed under the indoor unit
- Air filter inspected and replaced if dirty
- All supply and return vents confirmed open
- Outdoor condenser checked for debris or full ice coverage
- Condensate drain outlet cleared or wet/dry vac positioned
Realistic thaw timeline: Light ice (thin frost on coil fins) clears in a few hours with the fan running. A heavy freeze — coil fully encased, ice on the suction line — can require 2–24 hours to thaw completely. Monitor meltwater every few hours so the drain pan does not overflow.
Once the thaw is complete, run the 20–30 minute post-thaw test described above before drawing any conclusions about the root cause. A full thaw is required for accurate refrigerant diagnosis — ice masks the pressure and temperature readings technicians rely on.
Record everything: the time you noticed the freeze, what the filter looked like, whether the suction line frosted during the test run, and any sounds you heard. That log is genuinely useful to the technician and can shorten the diagnostic visit.
Key Takeaways
A frozen AC almost always comes down to restricted airflow or a refrigerant leak — and you can narrow it down with a clean filter, a full thaw, and a 20–30 minute test run before calling anyone.
| Point | Details |
|---|---|
| Shut off immediately | Set thermostat to OFF and fan to ON the moment you suspect a freeze to protect the compressor. |
| Allow a full thaw | Ice clears in 2–24 hours; never restart cooling until the unit and surrounding area are completely dry. |
| Replace the filter first | A dirty filter is the leading cause of frozen coils and the cheapest fix — always start here. |
| Run the 20–30 minute test | After thawing, watch the suction line; frost forming within that window strongly suggests a refrigerant leak. |
| Upright Construction & HVAC | For Los Angeles homeowners whose unit refreezes or shows leak/electrical signs, Upright offers same-day diagnostics and emergency repair. |
What I’ve learned after 15 years of frozen AC calls
Here is something I see constantly: homeowners restart their AC the moment the ice is gone, before they have replaced the filter or checked the vents. The unit runs for 45 minutes, freezes again, and now they are convinced it is a refrigerant leak. Half the time it is just a clogged filter they put back in. That one mistake doubles the service call.
The other thing worth saying plainly: refrigerant leaks are not rare, but they are also not the first thing to assume. In my experience, airflow problems — dirty filters, closed registers, slow blower motors — cause the majority of first-time freezes. Refrigerant issues tend to show up in systems that have been running for years, or in units that were not charged correctly from the start.
When you do call a technician, ask three questions before they start work: Do they hold EPA 608 certification? How do they find the leak (electronic sniffer, UV dye, or nitrogen pressure test)? And what warranty do they offer on the repair? A technician who cannot answer those questions clearly is not someone you want handling a sealed refrigerant system.
At Upright Construction & HVAC, we walk through every diagnostic step out loud with the homeowner. No surprise charges, no vague “it needed refrigerant” explanations. You deserve to know exactly what failed and why.
Upright Construction & HVAC is ready when your system needs more than a filter swap
When a clean filter and open vents do not stop the freeze, you need a technician who can measure refrigerant pressures, find the leak, and fix it correctly the first time. That is exactly what Upright Construction & HVAC does for homeowners across Los Angeles.

On a service call, the Upright team verifies the thaw is complete, runs a full leak search with electronic detection equipment, measures suction and discharge pressures, inspects the blower motor and capacitor, and gives you a transparent cost estimate before any work begins. No guesswork, no upselling. If the system refreezes, shows hissing or oil stains near the lines, or trips the breaker repeatedly, that is the moment to call. Upright offers same-day HVAC repair in Los Angeles and 24/7 support for emergency situations. You can also review what to do when your AC needs repairs to prepare before the technician arrives.
Useful sources
- Carrier: Will a Frozen AC Fix Itself?
- Trane: Top 5 Causes of Frozen AC Coils
- Trane: Evaporator Coil Frozen Troubleshooting
- Carrier: AC Evaporator Coil Frozen
- HouseWise: How to Check If Your AC Evaporator Coil Is Frozen
- HVAC Database: How to Fix AC Icing on the Refrigerant Line
- Upright Construction & HVAC: Emergency AC Repair Checklist
- Upright Construction & HVAC: Signs Your Air Conditioner Is Leaking
FAQ
Can a frozen AC unit be fixed without a technician?
Yes, if the cause is restricted airflow. Replacing a dirty filter, opening blocked vents, and clearing outdoor debris resolve the majority of first-time freezes without any professional help. If the unit refreezes after those steps, a refrigerant leak or mechanical fault is likely and a licensed technician is required.
How long should I leave my AC off if it froze up?
Leave it off until the ice is completely gone, which typically takes 2–24 hours depending on ice thickness. Running the fan on ON (without cooling) speeds the process. Do not restart the cooling cycle until the unit and drain pan are fully dry.
How do I quickly unfreeze an AC unit?
Set the thermostat to OFF and the fan to ON immediately. That circulates room-temperature air over the coil without running the compressor. Place towels under the indoor unit to catch meltwater and clear the condensate drain if you can. Natural thawing with the fan running is the fastest safe method.
How do I check if my AC unit is frozen?
Feel the airflow from your supply vents — weak or warm air is a strong indicator. Then look at the insulated copper suction line running to the outdoor unit; visible frost or ice on that line confirms a freeze. If you can safely open the air handler access panel with power off, frost on the coil fins is definitive.
When is a frozen AC a sign of a refrigerant leak?
If the suction line frosts within 20–30 minutes of restarting after a full thaw and clean filter, Trane’s guidance points strongly to low refrigerant from a leak. Other signs include hissing sounds near the coil and oil stains on the copper lines. Only a licensed technician with EPA 608 certification can confirm and repair a refrigerant leak.
Recommended
- Home HVAC Furnaces: Top 8 Quick Fixes For Heating Problems With Home HVAC Furnaces – Upright Construction & HVAC
- Boost AC Efficiency How Capacitors Transform Performance – Upright Construction & HVAC
- Wondering Why Your Heater Blowing Cold Air Instead Of Hot Air? Here’s Why – Upright Construction & HVAC
- How AC Emergency Diagnosis Works: A Homeowner’s Guide