- Signs your evaporator coil needs cleaning
- What tools and cleaners are actually safe to use
- How to clean your evaporator coil step by step
- How to clean and check your condensate pan and drain line
- What a licensed HVAC technician does during a professional coil cleaning
- The Upright Construction & HVAC technician checklist
- Key Takeaways
- The one thing I tell every homeowner about their AC
- Upright Construction & HVAC: licensed coil cleaning in Los Angeles
- Useful sources and further reading
- FAQ
- Recommended
You can clean your AC evaporator coil yourself — but only the light stuff. Vacuuming loose dust, replacing filters, and applying a no-rinse foaming cleaner to a lightly soiled coil are all reasonable DIY tasks. Anything deeper — heavy buildup, visible mold, oily residue near the coil, or a refrigerant smell — belongs with a licensed HVAC technician. Trane’s guidance is clear: superficial cleaning is fine for homeowners, but deep cleaning carries real electrical and water-damage risks that most people aren’t equipped to manage safely.
Before you touch anything, do these three things:
- Turn off the thermostat and cut power at the breaker. Both. Not just one.
- Look for any oily stains or a sweet chemical smell near the coil. Either one signals a refrigerant issue — stop and call a pro.
- Check your filter first. A clogged filter is often the real culprit behind poor cooling, and swapping it takes two minutes. Review your HVAC maintenance checklist before going further.
Signs your evaporator coil needs cleaning
Your AC will tell you when the coil is dirty — you just have to know what to listen for. Here are the signals worth acting on:
- Rising energy bills. A dirty coil forces the compressor to work harder. EVAPCO’s research shows that a structured cleaning program can yield measurable efficiency improvement in some systems — meaning a fouled coil is actively costing you money every month.
Environmental factors push cleaning frequency higher. Homes with pets shed dander that coats coils faster than almost anything else. High-dust areas, smokers in the home, nearby construction, and coastal salt air in places like the LA basin all accelerate fouling. Annual cleaning is the baseline for most homes; if two or more of these factors apply to you, plan for every six months.
Pro Tip: Cross-reference your utility bill with your last filter change. If your bill crept up in the same month you let the filter go past 60 days, a dirty coil is the likely cause. Pull the filter, hold it to a light source, and if you can’t see light through it, change it before doing anything else.
What tools and cleaners are actually safe to use
Getting this part right protects both you and your equipment. Here’s what to have on hand before you start:
| Category | Use This | Avoid This |
|---|---|---|
| Brush | Soft-bristle paintbrush or coil brush | Stiff wire brushes, abrasive pads |
| Vacuum | Shop vac with soft brush attachment | Standard household vacuum without attachment |
| Coil cleaner | No-rinse foaming evaporator cleaner (indoor-rated) | Condenser cleaners, acidic or caustic formulas |
| Fin tool | Fin comb (for straightening bent fins) | Screwdrivers, knives, or anything rigid |
| PPE | Nitrile gloves, safety glasses | No protection at all |
| Water | Minimal, low-pressure spray if rinsing | Pressure washers, garden hoses at full pressure |
The cleaner choice matters more than most people realize. Nu-Calgon’s product guidance explains that no-rinse evaporator cleaners are formulated as biodegradable alkaline foams designed specifically for indoor coils. Condenser cleaners are a different category — stronger, often acidic, and not safe for indoor use. Using the wrong one can corrode the aluminum fins or leave a residue that accelerates future buildup.
Never use household bleach or vinegar on your evaporator coil. Carrier’s safety guidance is explicit on this: both can damage coil materials and create fumes in an enclosed air handler cabinet. Stick to products labeled specifically for evaporator coils.
Pressure washers are the single most common DIY mistake. The delicate aluminum fins on an evaporator coil bend at surprisingly low pressure, and once they’re flattened, airflow is permanently restricted until a technician combs them back out. EVAPCO’s maintenance guidance and NADCA both flag pressure washers as a primary cause of coil damage during DIY attempts.
How to clean your evaporator coil step by step
Light cleaning is safe for most homeowners. This procedure covers dry cleaning plus an optional no-rinse foam application. Total time: roughly 45–75 minutes for a standard residential air handler.
Safety checklist before you start:
- Thermostat set to OFF
- Breaker for the air handler flipped OFF and confirmed with a non-contact voltage tester
- Gloves and safety glasses on
- No electrical terminals touched at any point
Step 1 — Locate and open the access panel (5–10 minutes)
The air handler is usually in a closet, attic, or utility room. Look for a removable sheet-metal panel secured by screws or clips on the side facing the return air duct. Most residential coils are either A-frame (two angled slab sections forming a peak) or a single slab. A-frame coils are more common in newer systems and give you access to both faces. Remove the panel carefully and set it aside.
Step 2 — Dry cleaning: vacuum and brush (15–20 minutes)
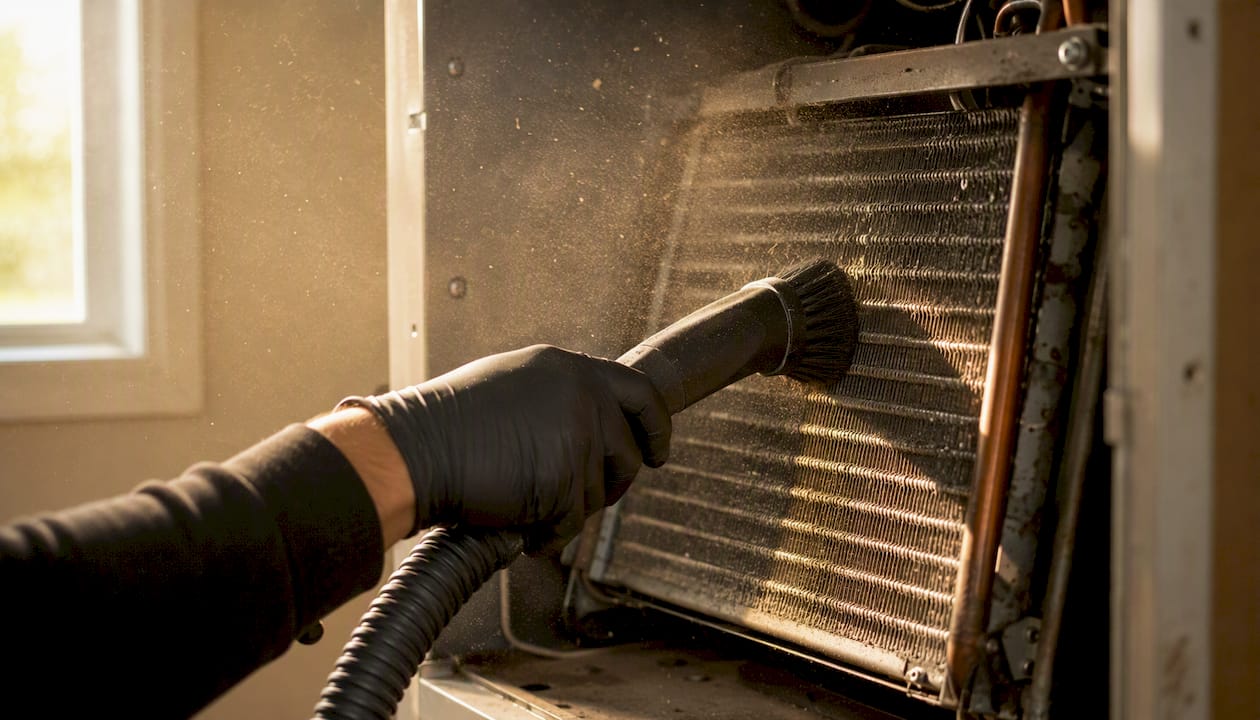
Use your shop vac with the soft brush attachment to vacuum loose dust and debris from the coil face. Always brush and vacuum in the direction of the fins — never across them. Work top to bottom. Sweep the inside of the cabinet and the condensate pan with the same attachment to remove any loose material before applying any liquid.
Step 3 — Apply no-rinse foaming cleaner (10–15 minutes active, 10–15 minutes dwell)
Shake the can and apply the foam evenly across the coil face, working in sections. The foam will expand into the fin channels, lift debris, and drain into the condensate pan below as it breaks down. Most products specify a 10–15 minute dwell time — follow the label. You do not need to rinse. The foam carries the loosened debris into the drain pan as it liquefies.
Step 4 — Inspect and clean the condensate pan (5–10 minutes)
While the foam dwells, look at the drain pan. If there’s standing water, scoop or vacuum it out. Check that the drain outlet isn’t blocked. A small amount of residue is normal; a thick sludge layer means the drain needs attention (see the next section).
Step 5 — Reassemble, restore power, and test (5–10 minutes)
Replace the access panel and secure it. Flip the breaker back on, set the thermostat to cool, and run the system for 10–15 minutes. Listen for unusual noises, check that condensate is draining normally, and confirm the supply air feels noticeably cooler than before.
Stop and call a licensed tech if you find any of these:
- Oily stains or a sweet smell near the coil (refrigerant leak)
- Visible black or green mold slime on the coil or pan
- Large crusted buildup that the foam doesn’t lift
- Bent or flattened fins across a significant portion of the coil face
- Any water dripping outside the drain pan during cleaning
How to clean and check your condensate pan and drain line
The condensate pan sits directly below the evaporator coil and collects the water that drips off during normal cooling. Biofilm, algae, and dust combine to form a sludge that blocks the drain outlet over time — and a blocked drain is one of the most common causes of water damage in homes with attic air handlers.
Remove standing water first. Use a wet/dry vac to pull out any water sitting in the pan before you do anything else. This prevents overflow when you disturb the drain line.
Inspect the drain outlet. The outlet is usually a PVC fitting at the end of the pan. If it’s visibly clogged with slime or debris, use a small brush or a flexible plumbing snake to break up the blockage.
Flush the drain line. Pour a cup of water slowly into the pan and watch whether it drains freely within 30 seconds. If it pools and sits, the line is partially blocked. A wet/dry vac placed at the exterior end of the condensate drain line (usually exits near the outdoor unit or through a wall) can pull the clog out from the other direction.
Use biocide tablets sparingly. Pan treatment tablets that contain a non-corrosive biocide (look for products labeled safe for HVAC drain pans) can slow algae regrowth when placed in the pan after cleaning. Use only products specifically labeled for this purpose — not bleach tablets, not pool chemicals.
Test flow one more time. Pour another cup of water into the clean pan. It should drain completely within 30 seconds. If it doesn’t, the blockage is further down the line and a technician with a drain snake or nitrogen flush tool is the right call.
A blocked condensate drain in an attic installation can overflow and cause ceiling damage within hours. If you’re not confident the line is clear, schedule a pro visit before running the system.
What a licensed HVAC technician does during a professional coil cleaning
A professional cleaning goes further than what’s safe or practical for most homeowners. Here’s what a typical residential service visit covers, based on Bryant’s documented procedure and standard industry practice:
- Full system shutoff with lockout verification
- Access panel removal and visual inspection for refrigerant leaks, freeze patterns, and physical damage
- Dry vacuum and brush pass to remove loose debris
- Application of a foaming no-rinse evaporator cleaner or a controlled wet rinse with appropriate drainage containment
- Condensate pan cleaning and drain line flush or snake
- Fin combing to straighten any bent sections
- Refrigerant pressure check
- Performance test: temperature differential across the coil, airflow measurement, and condensate drainage confirmation
- Written documentation of findings
Time and cost: A standalone evaporator coil cleaning typically takes 1–2 hours for a standard residential system. Cost ranges vary based on accessibility (attic vs. closet), severity of buildup, whether mold remediation is needed, and local labor rates. As part of a full annual tune-up, coil cleaning is usually bundled with other checks, which tends to be the most cost-effective approach.
Clean vs. replace: Cleaning makes sense when the coil is structurally intact and the buildup is surface-level. If a technician finds corrosion pitting on the copper tubing, a refrigerant leak that has been running long enough to leave oily deposits, or fins that are more than 30–40% flattened across the face, replacement is often the better financial decision. A system that’s 12–15 years old with a corroded coil is usually a candidate for full system evaluation rather than a repair-and-clean cycle.
The Upright Construction & HVAC technician checklist
Every coil cleaning job we do at Upright Construction & HVAC starts with a set of pre-checks that most homeowners don’t think about — and that prevent the problems we’re most often called in to fix after a DIY attempt.
Electrical isolation confirmed. We verify power is off at both the disconnect and the breaker before the panel comes off. We use a non-contact voltage tester on the air handler terminals before touching anything inside.
Before photos taken. We photograph the coil face, drain pan, and surrounding cabinet before cleaning. This protects you if a warranty question comes up later and gives us a baseline for the next visit.
Containment set up for attic work. Attic air handlers get drop cloths and a secondary drip collection tray under the unit before any liquid is applied. Water in an attic has nowhere to go except your ceiling.
Correct cleaner selected. We use indoor-rated no-rinse foaming cleaners appropriate for the coil material. We never bring condenser cleaners into an air handler cabinet.
Fins inspected and combed. We check fin condition across the full coil face and comb any bent sections before applying cleaner. Cleaning a coil with flattened fins doesn’t restore airflow — the fins have to be straight first.
Drain line tested before and after. We run a flow test before cleaning to establish baseline drainage, then again after to confirm the line is clear.
Performance test at the end. We measure supply air temperature and compare it to return air temperature. A properly functioning system should show a temperature differential in the expected range for the conditions. If it doesn’t, we tell you why before we leave.
The most common DIY mistakes we correct: bent fins from pressure washer use, chemical residue from household cleaners that accelerated buildup, and condensate lines that were never cleared after a foam application — leading to pan overflow and water damage in the ceiling below.
Pro Tip: If you’ve had a DIY cleaning done and your system still isn’t cooling well, the first thing to check is whether the condensate drain was cleared after the foam was applied. Foam carries debris into the pan — if the drain was already slow, that debris can create a full blockage within a few days of cleaning.
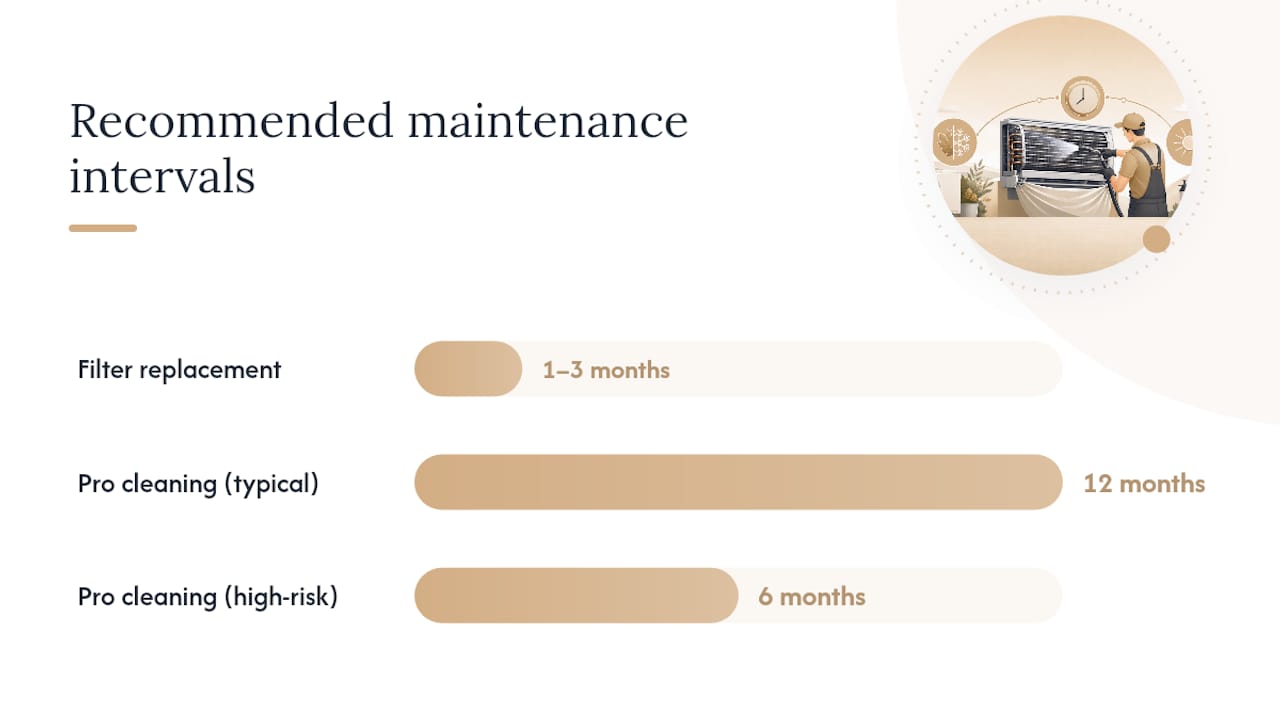
Energy.gov’s maintenance guidance recommends routine seasonal maintenance as a baseline for all residential AC systems. For most homes, annual professional coil cleaning and tune-up is the right baseline; if you have pets, heavy dust, smokers, or coastal exposure, plan for every six months. Spring — before the cooling season — is the best time to schedule maintenance.
- Filter replacement every 1–3 months. This is the single most effective thing you can do between professional visits. A clean filter keeps debris off the coil in the first place. The role your air filter plays in coil protection is often underestimated — a clogged filter is the leading cause of premature coil fouling. Use at minimum a MERV 8 filter; or MERV 11 or 13 if you have pets or allergy concerns.
- Keep the area around the air handler clear. Storage boxes, insulation, and debris near the unit restrict airflow and push more particulates toward the coil.
- Check the condensate pan visually each spring. A quick look before the cooling season tells you whether algae growth is starting before it becomes a blockage.
- Schedule a professional HVAC service contract if you want the maintenance handled automatically. A contract typically covers two visits per year, priority scheduling, and documentation for warranty purposes.
Key Takeaways
Safe light cleaning is within reach for most homeowners, but deep coil cleaning, mold, and refrigerant issues require a licensed HVAC technician every time.
| Point | Details |
|---|---|
| DIY scope is limited | Vacuuming, soft brushing, and no-rinse foam are safe; deep wet cleaning and mold remediation are not. |
| Filter schedule drives coil health | Replacing filters every 1–3 months is the most effective way to slow coil fouling between professional visits. |
| Annual pro cleaning is the baseline | Most homes need professional coil cleaning once a year; homes with pets, high dust, smokers, or coastal exposure should schedule every six months. |
| Warranty protection requires documentation | Keep service invoices and before/after photos to protect manufacturer warranty coverage after any cleaning. |
| Upright Construction & HVAC covers the full job | Licensed coil cleaning, condensate drain service, fin combing, and performance testing are all part of Upright’s evaporator coil cleaning service in Los Angeles. |
The one thing I tell every homeowner about their AC
If I had to give one piece of advice to every homeowner in Los Angeles, it would be this: change your filter on a schedule, not when you remember. That single habit does more to protect your evaporator coil than anything else you can do between professional visits. A clean filter means less debris reaching the coil, which means longer intervals between cleanings, lower energy bills, and a compressor that isn’t working against a restricted airflow problem every time it runs.
The spring tune-up matters too. Getting a licensed technician in before the cooling season starts means any buildup from the previous year gets cleared before it compounds through another summer of heavy use. At Upright Construction & HVAC, we see the same pattern every July: homeowners who skipped the spring visit calling us because their system stopped keeping up on a 95-degree day. The coil cleaning that would have taken an hour in April turns into an emergency call in the middle of a heat wave.
Set a reminder. Change the filter. Book the tune-up. Those three things will keep your system running well for years.
Upright Construction & HVAC: licensed coil cleaning in Los Angeles
When the coil needs more than a light vacuum, Upright Construction & HVAC is the call to make. Our licensed technicians handle the full cleaning sequence — electrical isolation, dry and foam cleaning, condensate drain flush, fin combing, and a documented performance test — so you know the job was done right and your warranty stays intact.

We serve homeowners across the greater Los Angeles area with same-day and next-day availability for maintenance visits and HVAC repair. Every appointment includes before-and-after photos, a written summary of findings, and a clear time window so you’re not waiting around all day. Financing is available for larger system work, and our 24/7 emergency line is open when something can’t wait.
To book a coil cleaning or annual tune-up, call us directly or use the online form at uprightch.com. We’ll confirm availability, give you an honest estimate, and show up on time.
Useful sources and further reading
The claims and recommendations in this article draw from the following authoritative sources:
- How to Clean Evaporator Coils | Trane
- How To Clean Your AC Evaporator Coil for Maximum Efficiency | Bryant
- Maintaining Your Air Conditioner | energy.gov
- Maintenance: Do coil cleaning | EVAPCO
- All about coil cleaning | NADCA blog
- Coil cleaner selection guide | Nu-Calgon (PDF)
- How To Clean AC Coils: AC Coil Cleaner Tips | Carrier
- How Often To Clean HVAC Coils: Yearly, Seasonal, Or More? | Eco Safeway
FAQ
Can I clean my evaporator coil myself?
Yes, for light cleaning. Vacuuming loose dust, replacing filters, and applying a no-rinse foaming evaporator cleaner are safe DIY tasks. Deep cleaning, mold removal, or anything involving refrigerant requires a licensed HVAC technician.
How do you clean an AC evaporator coil?
Turn off power at the thermostat and breaker, remove the access panel, vacuum with a soft brush attachment, apply a no-rinse foaming evaporator cleaner, let it dwell and drain into the condensate pan, then reassemble and test. Bryant’s professional procedure follows the same sequence with additional steps like fin combing and a refrigerant check.
How do I know if my evaporator coil is clogged?
The clearest signs are reduced cooling output, weak airflow from vents, ice forming on the refrigerant lines, musty odors from the vents, and a noticeable rise in your energy bill without a change in usage habits.
How often do AC evaporator coils need to be cleaned?
Annual cleaning is the right baseline for most homes. Homes with pets, high dust, smokers, or coastal exposure should plan for cleaning every six months. Filter replacement every 1–3 months reduces how fast the coil fouls between professional visits.
Does Upright Construction & HVAC clean evaporator coils in Los Angeles?
Yes. Upright Construction & HVAC provides licensed evaporator coil cleaning in Los Angeles, including condensate drain service, fin combing, and a documented performance test. Same-day and next-day appointments are available.