- What Does Water Damaged Drywall Look Like?
- When Should You Call a Professional Instead of DIY?
- Should You Dry Drywall in Place or Tear It Out?
- How Do You Properly Dry Drywall and Wall Cavities?
- How Do You Repair a Small Water-Damaged Drywall Patch Yourself?
- What Does It Cost to Repair Water-Damaged Drywall?
- Ernie M’s Practical Perspective From Upright Construction & HVAC
- How Do You Safely Dispose of Water-Damaged Drywall?
- Which Drywall Materials Resist Water Damage Best?
- The Real Lesson Behind Every Water-Damaged Wall
- When Should You Call Upright for Water-Damaged Drywall?
- Authoritative Resources to Learn More
- Sources
- FAQ
- Recommended
Drywall is worth saving when the seams are still tight, the panel shows no swelling, and you can get it fully dry within 24 to 48 hours. Replace it if it’s soft, sagging, moldy, or was soaked by contaminated water. Right now, stop the water source, take photos for your records, and either start drying immediately or call a licensed professional if the water is unsafe or the damage looks structural.
TL;DR:
- Drywall can be preserved if it shows no signs of swelling, sagging, or mold, and can be fully dried within 24 to 48 hours using proper ventilation.
- Moisture meters and thermal cameras are essential tools to accurately assess hidden water damage behind drywall or within wall cavities.
- Professional intervention is required when there is visible mold, sewage or contaminated water, or if water has been sitting for more than 48 hours.
- Replacement is necessary when drywall is soft, sagging, or contaminated; otherwise, in-place drying is often sufficient.
- Using water-resistant or mold-proof drywall materials can significantly reduce future damage and mold growth risks in leak-prone areas.
What Does Water Damaged Drywall Look Like?
Not every wet wall needs to come down, but you need to know what you’re looking at before you decide. Some signs are obvious the moment you walk into the room. Others hide behind a coat of paint until the problem has already spread.
Start with what you can see. Brown or tan staining, bubbling paint, and a texture that looks warped or bumpy are the classic giveaways. Peeling paint or wallpaper near a baseboard or ceiling corner almost always means moisture is working its way through the material behind it.
Then check what you can feel. Press gently on the suspect area. If it gives like a wet sponge, crumbles at the edges, or sags under its own weight, the gypsum core has absorbed water and structural integrity is compromised. A saturated drywall panel can absorb several times its normal weight, which is exactly why sagging ceilings are a safety hazard, not just a cosmetic one.
Some signs don’t show up on the wall at all:
- A musty, earthy smell that lingers even after the room airs out
- Your HVAC system pulling that same odor into other rooms
- A water bill that jumped for no obvious reason
- Dripping or trickling sounds inside a wall cavity
If you notice any of these but the drywall surface looks fine, don’t assume you’re in the clear. Drywall can look dry on the outside while the cavity behind it stays wet for days. A small inspection hole, drilled low on the wall or behind a baseboard, lets you check the cavity without committing to a full teardown. If you find standing water, soaked insulation, or a strong odor when you open that hole, that’s your cue to stop guessing and bring in someone with a moisture meter and a proper assessment. For homeowners weighing whether other damaged interior finishes are worth saving too, this guide to assessing interior doors covers a similar decision process for trim and doors near the affected wall.
When Should You Call a Professional Instead of DIY?
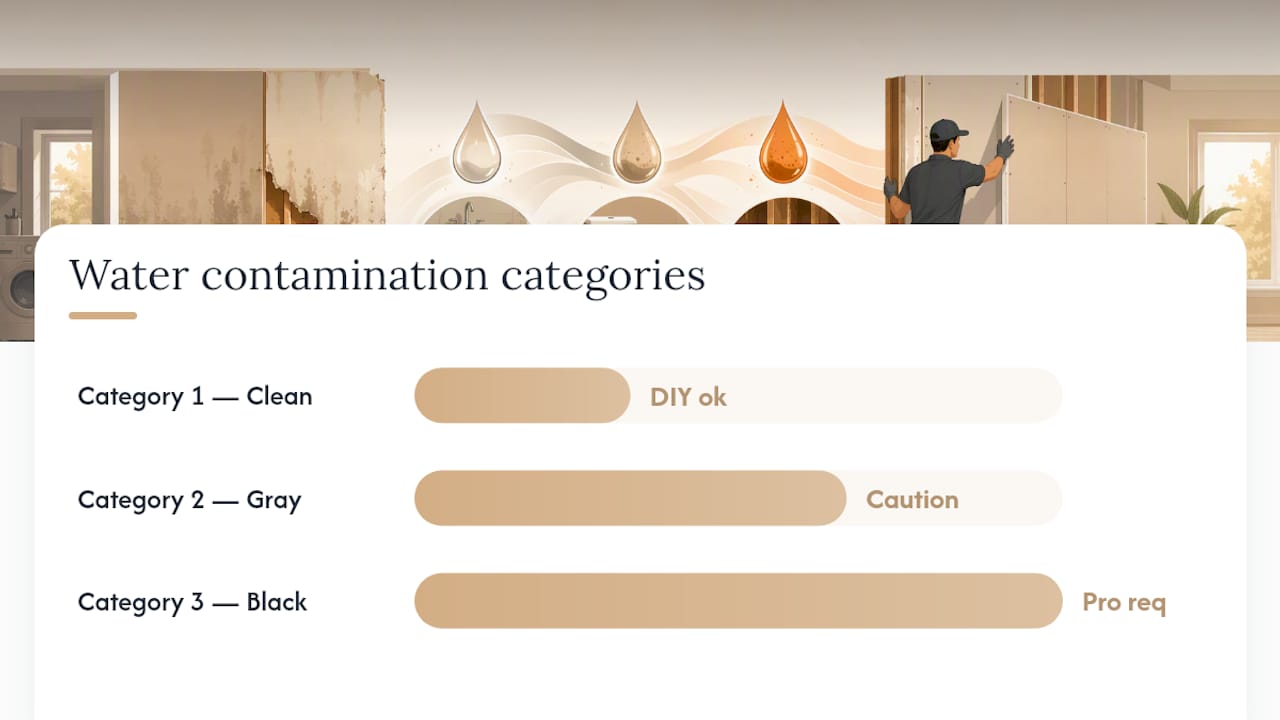
Not all water is created equal, and this is where a lot of homeowners get into trouble. Restoration professionals classify water into three categories, and the category determines whether you can safely handle this yourself.
Category 1 is clean water from a supply line or appliance. Category 2 is “gray water” from sources like a washing machine overflow or a dishwasher leak. It’s already carrying some contaminants. Category 3 is “black water,” meaning sewage backups, flooding from outside, or any water that has been sitting long enough to grow bacteria. This is the category where PPE and professional remediation aren’t optional.
Here’s a mistake I see constantly: people turn on fans right away, before they know what kind of water they’re dealing with. If that water is contaminated, a fan doesn’t dry the problem out. It aerosolizes it and spreads it through the rest of the house.
Call a pro immediately if you see any of these:
- Visible mold growth, especially anything dark or fuzzy
- Sewage backup or contact with outdoor floodwater
- Water that’s been sitting more than 48 hours
- A ceiling that’s sagging, bulging, or dripping
Before anyone touches anything, shut off electricity to the affected area if you can do so safely, close off the room from the rest of the house, and turn off the HVAC system so it doesn’t circulate air through the wet zone.
Pro Tip: If you’re not sure which water category you’re dealing with, treat it as contaminated until proven otherwise. It costs you nothing to be cautious and it can save you a much bigger cleanup bill later.
Should You Dry Drywall in Place or Tear It Out?
This is the decision that determines your entire repair budget, so it’s worth slowing down and getting it right. The good news is the criteria are pretty clear cut.
Dry-in-place is reasonable when:
- There’s no visible swelling or warping in the panel.
- The seams and joints are still tight and intact.
- You can ventilate the wall cavity, either by leaving it open or through an access point.
- You can realistically get it fully dry within 24 to 48 hours.
Replacement is the right call when:
- The drywall is soft, spongy, or sagging.
- You see mold on the paper backing, not just surface discoloration.
- The water source was contaminated (Category 2 or 3).
- You can’t dry the material within that 48 hour window.
The EPA’s own remediation guidance backs this up directly: wallboard may be dried in place if there’s no obvious swelling and the seams are intact, but otherwise it should be removed, discarded, and replaced. That’s not a suggestion, it’s the standard restoration contractors work from.
A moisture meter takes the guesswork out of this. Pin-type meters give you a direct reading of moisture content inside the material, while thermal imaging cameras help you spot cold, damp zones behind an intact surface before you ever cut into it. Professionals combine both tools because a thermal camera shows you where to look, and the moisture meter confirms what’s actually happening inside.
Here’s the sequence that works, in order: stop the leak, document everything with photos, inspect and test with a moisture meter or thermal camera, then either dry the material in place or remove it, and finally verify the reading is back to normal before you patch or paint anything. Skipping that last verification step is one of the most common reasons water stains reappear a few months later.
How Do You Properly Dry Drywall and Wall Cavities?
Timing matters more than almost anything else in this whole process. The EPA recommends drying wet building materials within 24 to 48 hours specifically because mold spores that are always present in the air need moisture and time to establish a colony. Miss that window and you’ve likely traded a drying job for a mold remediation job.
Start by removing any standing water with a wet/dry shop vac or a dedicated water-extraction unit. Once the bulk of the water is gone, bring in equipment that actually accelerates evaporation rather than just moving damp air around the room:
- High-velocity axial fans aimed to push air across wet surfaces, not just into the room
- A commercial or residential dehumidifier running continuously to pull moisture out of the air itself
- Gentle heat, where appropriate, to speed evaporation without warping materials
Wall cavities are trickier than open surfaces because the wet insulation and framing behind the drywall don’t get direct airflow. Removing baseboards or drilling small access holes near the floor creates a path for air to move through the cavity. If insulation is soaked, especially fiberglass batting, it usually needs to come out entirely. Wet insulation holds moisture against the framing far longer than the drywall itself does, and it rarely dries fast enough to avoid becoming a mold reservoir. Structural drying equipment used by restoration crews is built around exactly this problem, forcing air through wall cavities rather than just across the surface.
You’ll know you’re done when a moisture meter reads consistent with the dry areas of the same wall, and there’s no new staining, discoloration, or smell after a few days of monitoring.
Pro Tip: Don’t paint or patch the moment the surface looks dry. Wait a few extra days and recheck with a moisture meter. A wall that reads dry on Monday can still be releasing moisture from deeper in the cavity on Thursday.
How Do You Repair a Small Water-Damaged Drywall Patch Yourself?
If the area is small, the water was clean, and you dried it within that 24 to 48 hour window, this is a reasonable weekend project for a handy homeowner.
What you’ll need:
- Replacement drywall sheet
- Drywall screws
- Joint compound
- Mesh or paper tape
- Primer and texture-matching tools (if your wall has texture)
The steps, in order:
- Cut out the damaged section, extending a few inches past any visible staining to make sure you’re not leaving compromised paper behind.
- Remove any wet insulation from the cavity and confirm the studs and framing are dry to the touch.
- Recheck the cavity with a moisture meter before closing anything up. This step is easy to skip and it’s the one that causes callbacks.
- Cut and install the new drywall patch, securing it to the studs with screws.
- Tape the seams, apply joint compound in thin coats, and let each coat cure fully before sanding.
- Match the existing texture, then prime and paint.
Before you call it finished, do one more moisture check and keep an eye on the patch over the following week for any new staining. Respect the cure times on your joint compound. Rushing to paint over compound that hasn’t fully cured is one of the most common reasons patches crack or discolor within a few months.
This workflow is for small, contained, clean-water damage only. If you find mold once you open the wall, if a ceiling is sagging, or if the texture is a complex pattern you can’t reasonably match, that’s your signal to stop and bring in a professional rather than risk a bigger repair down the line.
What Does It Cost to Repair Water-Damaged Drywall?
Costs vary a lot depending on how much material is affected and whether contamination changes the scope of the job. For budgeting purposes, typical repair costs break down into a few common scenarios: a single-sheet patch with texture matching averages around $450, a multi-sheet repair that includes insulation replacement averages closer to $1,200, and a full-room re-drywall job can reach $2,500 or more.
Timeline follows a similar pattern. A single sheet patch, once the area is confirmed dry, can often be finished in a day. Multi-sheet repairs typically run 2 to 3 days between drying, hanging, and finishing. A full room, factoring in adequate drying time plus taping, texture, and paint, usually takes 3 to 5 days.
Contamination changes everything about the math. If the water source falls into Category 3, materials that would otherwise be dried in place have to be removed and disposed of as contaminated waste, which adds disposal fees, hazmat handling, and labor to a job that would’ve been much cheaper with clean water.
If you’re filing an insurance claim, document the damage the moment you find it, before you touch or move anything. Note whether the leak was sudden, like a burst pipe, or gradual, like a slow roof leak, since insurers often treat these very differently. Ask your contractor or adjuster for actual moisture readings rather than a visual estimate. That documentation is often what separates a smooth claim from a denied one. For a deeper look at how these costs stack up against a full restoration bill, this breakdown of water damage restoration costs is worth a read before you sign anything.
Ernie M’s Practical Perspective From Upright Construction & HVAC
Our crews handle everything from emergency water extraction to full structural drying and reconstruction, and after years of walking into these situations, the mistakes tend to repeat themselves. The biggest one? Painting over a stain without ever opening the cavity to see what’s behind it. A dry-looking surface doesn’t mean a dry wall. I’ve seen homeowners repaint the same spot three times in a year because nobody checked what was happening inside the wall.
When you call us, send photos, tell us whether the water is still active, and describe roughly how long it’s been wet. That lets us prioritize the call correctly. When we arrive, expect moisture mapping with a meter and thermal camera before anyone touches a wall. That map is what tells us honestly whether you’re looking at a patch job or something bigger.
How Do You Safely Dispose of Water-Damaged Drywall?
Once you’ve decided a section of drywall has to go, disposal isn’t quite as simple as tossing it in the regular trash, especially if mold or contamination is involved.
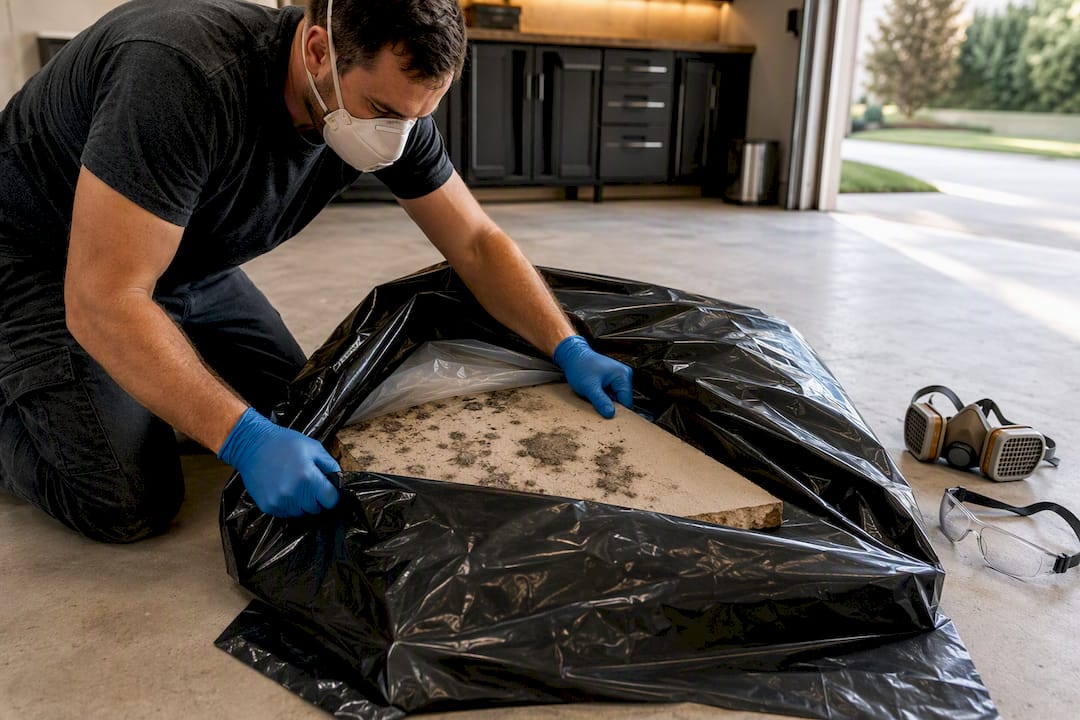
Bag or wrap contaminated drywall in heavy plastic sheeting before moving it through the house. This keeps mold spores and debris from spreading through hallways and other rooms during removal. Wear gloves, an N95 respirator or better, and eye protection while handling material that shows any mold growth, since disturbing it releases spores into the air.
Most municipal waste programs won’t accept large volumes of contaminated building material through regular curbside pickup. Check with your local waste authority or landfill about construction debris disposal rules. Many areas require it to go through a specific drop off point or a licensed hauler, particularly for anything affected by Category 3 water.
Keep drywall separated from other renovation debris when possible. Mixing contaminated material with clean waste increases the risk of cross-contamination and can complicate disposal if a hauler needs to verify what’s in the load. If you’re working with a restoration or remodeling contractor, ask directly how they handle disposal and whether it’s included in their quote. This is a detail that’s easy to overlook until you get a surprise line item on the final bill. Professional crews typically build proper disposal into the scope of a remediation and reconstruction job from the start, which avoids that surprise entirely.
Which Drywall Materials Resist Water Damage Best?
If you’re rebuilding after water damage, this is your chance to make the next leak a lot less painful. Standard paper-faced drywall is the most vulnerable option available, since the paper backing is exactly where mold takes hold first.
Moisture-resistant drywall, often called “green board” for its tinted paper facing, holds up better in humid environments like bathrooms but still isn’t built for direct water exposure or flooding. For rooms with real water risk, cement board or fiber-cement backer board handles moisture far better than any paper-faced product, though it’s typically reserved for tiled areas rather than full walls.
Paperless drywall, faced with fiberglass mesh instead of paper, is worth strong consideration for basements, laundry rooms, and areas near plumbing. Without paper for mold to colonize, it holds up considerably better in a repeat-leak scenario, even though it’s not fully waterproof either.
None of these materials make a wall flood-proof. What they do is buy you time and reduce the odds that a small leak turns into a mold problem before anyone notices. If you’re planning a remodel in a leak-prone area like a kitchen or bathroom, it’s worth raising material choice with your contractor before the job starts, not after the next leak happens. It’s a small upgrade cost that pays for itself the first time a pipe fails.
The Real Lesson Behind Every Water-Damaged Wall
Here’s what I’ve come to believe after years of walking into these jobs: the drywall itself is rarely the real problem. The real problem is how long it took someone to notice the water in the first place. Most of the “should we replace it” debates I get called into wouldn’t even be debates if the leak had been caught on day one instead of day five.
Conventional advice focuses almost entirely on drying technique, fans, dehumidifiers, timelines. All of that matters, but it treats symptoms. The homeowners who come out ahead are the ones who inspect early and often, who don’t assume a dry-looking wall means a dry cavity, and who aren’t afraid to drill a small hole to find out for sure.
If there’s one thing I’d tell every homeowner to prioritize, it’s this: verify before you cover anything up. Moisture meters are inexpensive, and a five-minute check can save you from repainting the same stain three times in a year.
— Ernie M
When Should You Call Upright for Water-Damaged Drywall?
If you’re staring at a stained ceiling or a soft spot on the wall and you’re not confident about what’s happening behind it, that’s exactly the moment to bring in a second set of eyes. Professional water damage repair services use moisture meters and thermal imaging instead of assumptions, providing an honest assessment of whether the damage can be patched or requires removal.

When you call, send us photos of the damage, tell us whether water is still active, and let us know roughly where the leak originated. That’s enough for our team to prioritize your case correctly, and some companies offer 24/7 availability for emergencies that can’t wait until regular business hours. From emergency water extraction to full structural drying, we handle the whole process with transparent pricing at every step, no surprise line items after the fact. If the damage turns out to involve more than drywall, our HVAC repair team can also check whether your ductwork or system took on moisture during the same event. Give us a call and we’ll get someone out to assess the situation properly.
Authoritative Resources to Learn More
For official drying and remediation guidance, see the EPA’s mold and moisture guide and its remediation guide, plus a detailed repair cost breakdown.
Sources
- Mold Remediation in Schools and Commercial Buildings Guide: Chapter 4 | US EPA
- Drywall Ceiling Water Damage Repair Cost: 2026 Pricing Guide | WaterDamageFinder
FAQ
How long does drywall take to dry after water damage?
Drywall should be fully dried within 24 to 48 hours of getting wet to keep mold risk low. Actual drying time depends on how saturated the material is and whether you’re using fans and a dehumidifier, or just letting it air dry on its own.
What does water damage behind drywall look like?
Behind an intact surface, water damage often shows up as a musty smell, a wall that feels cool or damp to the touch, or soft spots when you press on it. Opening a small inspection hole or checking with a moisture meter is the only reliable way to confirm what’s happening inside the cavity.
How much does it cost to repair a water-damaged drywall ceiling?
A single-sheet ceiling patch with texture matching averages around $450, while a larger repair involving multiple sheets and insulation replacement runs closer to $1,200. A full-room re-drywall job can reach $2,500 or more depending on ceiling height and texture complexity.
Will drywall grow mold if it gets wet?
Yes, if it stays wet past the 24 to 48 hour drying window, mold has enough time to colonize the paper backing. Even drywall that looks dry on the surface can still harbor mold growth if the cavity behind it stayed damp longer than that.
Can Upright Construction & HVAC help decide if my drywall needs to be replaced?
Yes, Upright Construction & HVAC offers professional water damage assessment and inspection using moisture meters and thermal imaging to determine whether drywall can be dried in place or needs removal. Pricing for assessment and repair work is available on request through the company’s site.