- Top Signs Your Ducts Are Leaking
- How Do You Find and Test for Duct Leaks Yourself?
- DIY Fixes and the Right Materials to Use
- When Should You Hire a Professional Instead?
- How Contractors Make Ducts Right: Sealing, Insulating, and Safety Checks
- Safety, Common Pitfalls, and Ongoing Maintenance
- Upright Construction & HVAC’s Approach to Duct Inspections
- A Practical Next Step
- How Upright Construction & HVAC Can Help
- Sources
- FAQ
- Recommended
Yes, leaky ducts are a real problem, and they’re probably wasting more of your energy dollars than you think. A typical home loses 20% to 30% of conditioned air through gaps, holes, and disconnected joints in the duct system. Start by inspecting any ducts you can reach in the attic, basement, or garage, and seal small visible gaps with proper mastic or foil tape. If you find major disconnections, smell burning near a furnace, or rooms stay uneven no matter what you try, stop and call a professional.
TL;DR:
- Duct leaks can cause homes to lose up to 20% to 30% of conditioned air, significantly increasing energy bills and reducing comfort.
- Visible signs include uneven room temperatures, rising bills without increased usage, and poor airflow from vents, especially in accessible ducts.
- DIY detection methods, like listening for air movement or checking for light leaks with a flashlight, work on obvious leaks but miss hidden ones behind walls or in inaccessible areas.
- Proper sealing materials include mastic sealant and UL-181 foil tape, but significant leaks or those behind walls require professional diagnosis and repair.
- Regular maintenance and inspections before heating season help prevent leak growth, but professional replacement is advisable for hard-to-reach or safety-related issues.
Top Signs Your Ducts Are Leaking
Your energy bill is often the first clue. If heating and cooling costs have crept up without a clear reason, air duct leaks are a common culprit, since a home can lose up to 20% to 30% of its conditioned air before it ever reaches a register.
Watch for these signs:
- Rooms that run noticeably hotter or colder than the rest of the house, even with the thermostat set correctly
- Energy bills that climb season over season without a matching jump in usage
- Dust buildup that returns fast after cleaning, often pulled in through gaps in return ducts
- Weak or barely-there airflow from vents that used to blow strong
- Visible tears, disconnected sections, or crushed flex duct in the attic or crawlspace
Each of these points to the same mechanical problem: air is escaping before it reaches your living space, or unfiltered outside air is getting pulled in. Either way, your HVAC system works harder to hit the same comfort level, and your ductwork is usually where to look first.
How Do You Find and Test for Duct Leaks Yourself?
Start with what you can see and reach. Most homeowners can do a basic inspection without any special tools.
- Walk your attic, basement, garage, and any exposed duct runs, looking closely at every seam, elbow, and connection point.
- Run your hand along the ductwork while the system is running. Air moving across your skin at a joint means air is escaping there.
- At night, shine a flashlight inside the duct from one end while a second person watches from outside for light leaking through a wall or attic gap.
- Hold a lit incense stick or a smoke pencil near suspected seams. If the smoke wavers or gets pulled sideways, you’ve found a leak.
- Try the door-and-paper test: run the system, hold a sheet of paper near a closed door’s threshold, and see if it flutters, which suggests a pressure imbalance from leaking supply or return ducts.
Statistic to keep in mind: homes with visible attic or crawlspace ductwork commonly show leakage rates that hit the higher end of that 20% to 30% range, simply because uninsulated, unconditioned spaces are where connections fail first.
These DIY checks catch obvious problems, but they miss leaks hidden behind drywall or buried in inaccessible runs. That’s where professional diagnostics come in: a blower-door test measures how airtight your whole house is, a duct-blower test (often called a Duct Blaster) isolates and quantifies leakage in the duct system specifically, and an infrared scan shows temperature differences that reveal air escaping into walls or ceilings you’d never spot with a flashlight.
DIY Fixes and the Right Materials to Use
If you find a leak you can reach, sealing it yourself is often reasonable, as long as you use the right materials. Skip the roll of gray fabric tape from the hardware store. Despite the name, standard duct tape breaks down under attic heat and loses its grip within a year or two, leaving you with the same leak and a sticky mess.
What actually holds up:
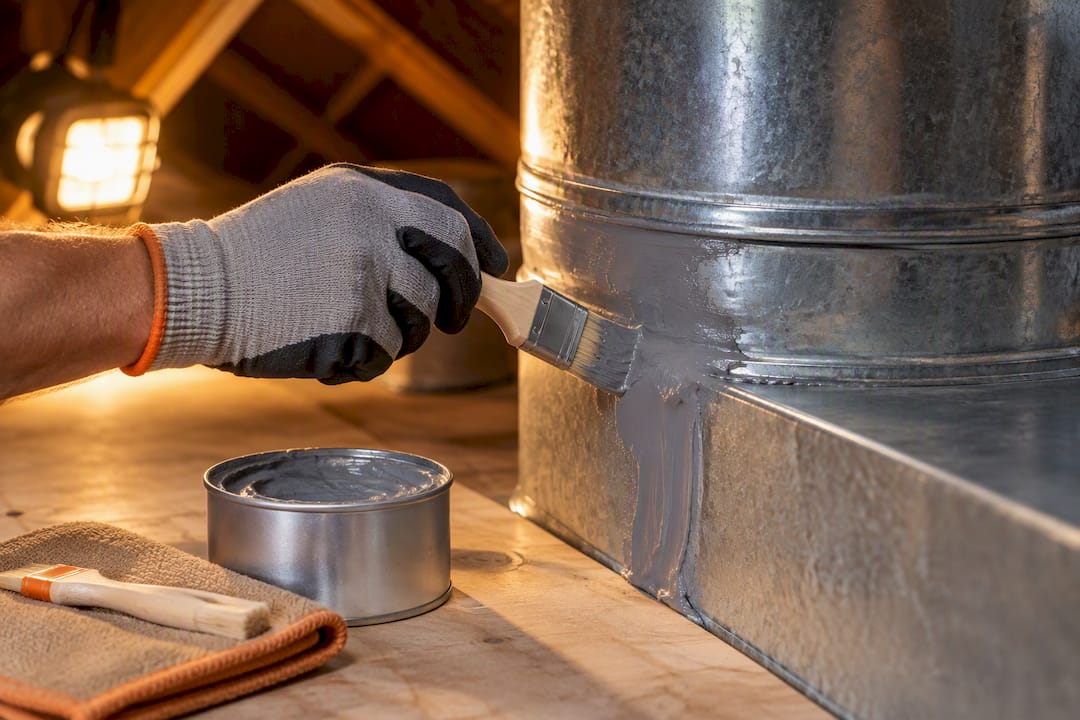
- Mastic sealant paste, brushed on by hand over seams and connections, for a durable, long-lasting seal
- UL-181 metal-backed foil tape, rated specifically for HVAC duct use and built to handle temperature swings
- Aerosol duct sealants, sprayed into the system to seal leaks from the inside, useful for runs you can’t physically reach
Clean the surface first. Dust and grease keep mastic from bonding properly. For any gap wider than about a quarter inch, embed a strip of fiberglass mesh into the mastic before it sets. That mesh keeps the seal from cracking apart as the ductwork expands and contracts through hot summers and cold nights.
Pro Tip: Give mastic a full 24 hours to cure before you button up the attic access panel. A rushed seal that hasn’t set is only marginally better than no seal at all.
Even careful DIY work has limits. Leaks behind finished walls, under slab-run ducts, or deep in tight crawlspaces usually need a pro with the right tools. And sealing without addressing insulation in an unconditioned attic only solves half the problem.
When Should You Hire a Professional Instead?
Some jobs are worth doing yourself. Others aren’t, and knowing the difference saves you money and headaches down the line.
Call a contractor when you notice:
- Leaks in hard-to-reach attic or crawlspace runs that you can’t safely access
- Any smell of exhaust or signs your furnace might be backdrafting, which is a safety issue, not just an efficiency one
- DIY sealing attempts that didn’t fix uneven temperatures or high bills
- Ductwork that seems to be losing a large share of airflow system-wide, not just at one register
Professional work typically includes a duct-blower measurement to quantify exactly how much air you’re losing, targeted mastic or aerosol sealing based on that data, insulation upgrades where ducts run through unconditioned space, airflow balancing across rooms, and a final combustion-safety check.
On cost: expect pricing to vary by home size and how much ductwork needs attention, since every house’s duct layout is different. As for whether the expense pays off, it helps to know what your insurance won’t cover. Standard homeowners insurance generally excludes normal wear and tear on ductwork, covering only sudden, accidental damage like fire or a fallen tree branch. Duct sealing is an investment you make, not a repair your policy handles.
How Contractors Make Ducts Right: Sealing, Insulating, and Safety Checks
A thorough contractor doesn’t just slap mastic on the first gap they see. There’s a sequence to it, and skipping steps is how homeowners end up with a fix that doesn’t actually hold.
- Whole-system inspection. The technician traces every accessible run, noting connections, insulation condition, and obvious damage.
- Quantitative leakage test. A duct-blower measurement establishes a baseline number, not a guess, so the crew knows exactly how much air is escaping before touching anything.
- Sealing protocol. Mastic, UL-181 tape, or aerosol sealant gets applied based on what the leak actually needs, not a one-size-fits-all approach.
- Insulating. Ducts running through attics or crawlspaces get wrapped to reduce heat gain and loss, since sealing alone doesn’t stop a duct from cooking in a 140-degree attic.
- Airflow testing and balancing. Registers get checked room by room to confirm air is actually reaching where it should.
- Combustion-safety verification. This last step matters more than most homeowners realize: sealing a house too tight without checking gas appliances can pull exhaust back into living space instead of venting it outside.
When you’re comparing quotes, ask for before-and-after leakage numbers, not just a verbal “it’s fixed.” A contractor who can show you the data has actually done the work.
Safety, Common Pitfalls, and Ongoing Maintenance
The most common mistake is easy to picture: someone spots a gap, wraps it in gray tape from the garage, and calls it done. That tape usually fails within a year, and worse, it can mask a leak that keeps growing underneath it.
The other pitfall is subtler. Sealing supply ducts without checking your return side or overall house pressure can create imbalances that pull combustion exhaust back indoors instead of pushing it out. This is why a combustion-safety check isn’t optional after sealing work, regardless of which duct section you’re fixing.
Keep leaks from creeping back with a short annual routine:
- Do a quick visual check of accessible ducts once a year
- Replace HVAC filters on schedule so airflow stays steady
- Re-inspect ductwork after any roofing work or attic project, since contractors up there can bump or crush duct runs without realizing it
Pro Tip: Mark your calendar for a duct check every fall, right before heating season ramps up. Small gaps are far easier to catch before they’ve been leaking conditioned air all winter.
Upright Construction & HVAC’s Approach to Duct Inspections
Ernie here. Over the years our team has walked through hundreds of Los Angeles attics, and the pattern repeats: homeowners assume their ductwork is fine because the system still runs. It usually isn’t fine, it’s just running inefficiently.
We prioritize accessible leaks first, then bring in duct-blower testing when the numbers don’t add up. Combustion safety always gets checked before we call a job done, and we insulate any duct running through an unconditioned attic instead of just sealing it. Cost-effective repairs start with fixing the biggest leaks first, not chasing every hairline gap.
A Practical Next Step
This weekend, check your attic registers and visible duct connections for gaps or disconnections. If anything looks off, or your rooms just never feel right, schedule a professional duct diagnostic rather than guessing. A good contractor will show you the numbers, not just tell you it’s fixed.
— Ernie M
How Upright Construction & HVAC Can Help
A good duct service gives homeowners something a lot of duct work skips: a straight answer, backed by actual measurements, before anyone touches your ductwork. Services include inspection, sealing and repairs, insulation upgrades for attic or crawlspace runs, airflow balancing, and combustion-safety checks often left out by quick jobs.

When you book a visit, expect a real inspection first, not a sales pitch. The technicians will walk your ductwork, run the tests that matter, and provide a transparent quote with documentation on what was found and why fixing it is recommended. If a leak is minor and DIY-fixable, the professional may indicate that as well. Ready to find out how much conditioned air your home is actually losing? Get a quote through our HVAC repair page and we’ll get a technician out to take a real look.
Sources
For homeowners who want to dig deeper: ENERGY STAR’s duct sealing guidance, the Department of Energy’s home energy assessment guide, and PNNL’s duct leakage test resources.
- Duct Sealing | ENERGY STAR
- Guide to home energy assessments | U.S. Department of Energy
- Does homeowners insurance cover HVAC? | Allstate
FAQ
How Much Duct Leakage Is Acceptable?
New construction typically targets total duct leakage of no more than 4 CFM25 per 100 square feet, roughly 5% of system airflow. For existing homes, professionals usually aim to cut leakage by about two-thirds from whatever baseline test reveals.
Does Homeowners Insurance Cover Air Duct Replacement?
Usually not for normal wear and tear. Standard homeowners policies generally cover ductwork only when damage comes from a sudden, accidental peril like fire or a falling tree limb, not gradual deterioration or age.
How Much Does It Cost to Repair Air Duct Leaks?
Cost depends on how much ductwork needs attention and how accessible it is, so pricing varies house to house. Upright Construction & HVAC provides a transparent quote after inspecting your specific system, available through a service visit.
Is Sealing Air Ducts a Good Idea?
Yes. Since homes commonly lose 20% to 30% of conditioned air through duct leaks, sealing with proper materials like mastic or UL-181 tape typically improves comfort and lowers energy costs. Pair sealing with insulation in unconditioned spaces for the best results.